You're on a clothing product page, the size chart is open, and you're still unsure whether to order small or medium. Your height and weight seem like useful clues, but they don't tell you how a shirt will sit across your shoulders or whether a waistband will feel comfortable.
A height weight visualizer can make that decision easier by turning shopper inputs into a body preview and a garment-specific size suggestion. It's most useful when retailers treat height and weight as the beginning of a fit estimate, not a complete description of a person's body or a guarantee that a garment will fit perfectly.
Table of Contents
- What a Height Weight Visualizer Actually Does
- How the System Turns Inputs into a Body Model and a Size
- Why Height and Weight Alone Are Not Enough
- Selfie Try On Versus Model Based Preview
- Inside the On Page Experience Shoppers Actually Use
- What Retailers Actually Gain from Adding One
- Implementation Paths and Merchant Best Practices
- Privacy, Accuracy, and What Shoppers Should Be Told
What a Height Weight Visualizer Actually Does
A height weight visualizer works like a fitting-room aid on a product page: it brings a representation of the shopper's body alongside information about the garment. Product photos show how clothing looks on a particular model. A personalized preview gives shoppers another reference for judging how it might look on them.
Height and weight provide the starting point. Depending on the tool, shoppers may add a body-shape description and choose between a selfie-based experience and a model-based preview. Those choices help make the experience personal, while garment measurements give the size recommendation its product-specific context. A visual preview and sizing guidance serve different purposes.
The underlying concept is anthropometry, the systematic measurement of human body dimensions. The CDC's National Health and Nutrition Examination Survey, or NHANES, provides nationally representative reference data through a complex sample design. Its anthropometric reporting includes height, weight, BMI, circumferences, and limb lengths (CDC anthropometric report). That range of measurements helps explain why people with similar height and weight can have different proportions.
For retailers, the practical job is to connect shopper inputs, an estimated body model, garment measurements, and the store's size chart. The avatar is the visible part of that connection. Accurate product data and clear fit logic determine how useful the sizing guidance becomes; a convincing image alone offers little assurance about waistband comfort or shoulder room.
The goal is a better-informed purchase decision.
When shoppers can view a garment on a relevant body model and see a product-specific recommendation, they have clearer grounds for choosing a size to add to the cart, with room for their own fit preferences.
How the System Turns Inputs into a Body Model and a Size
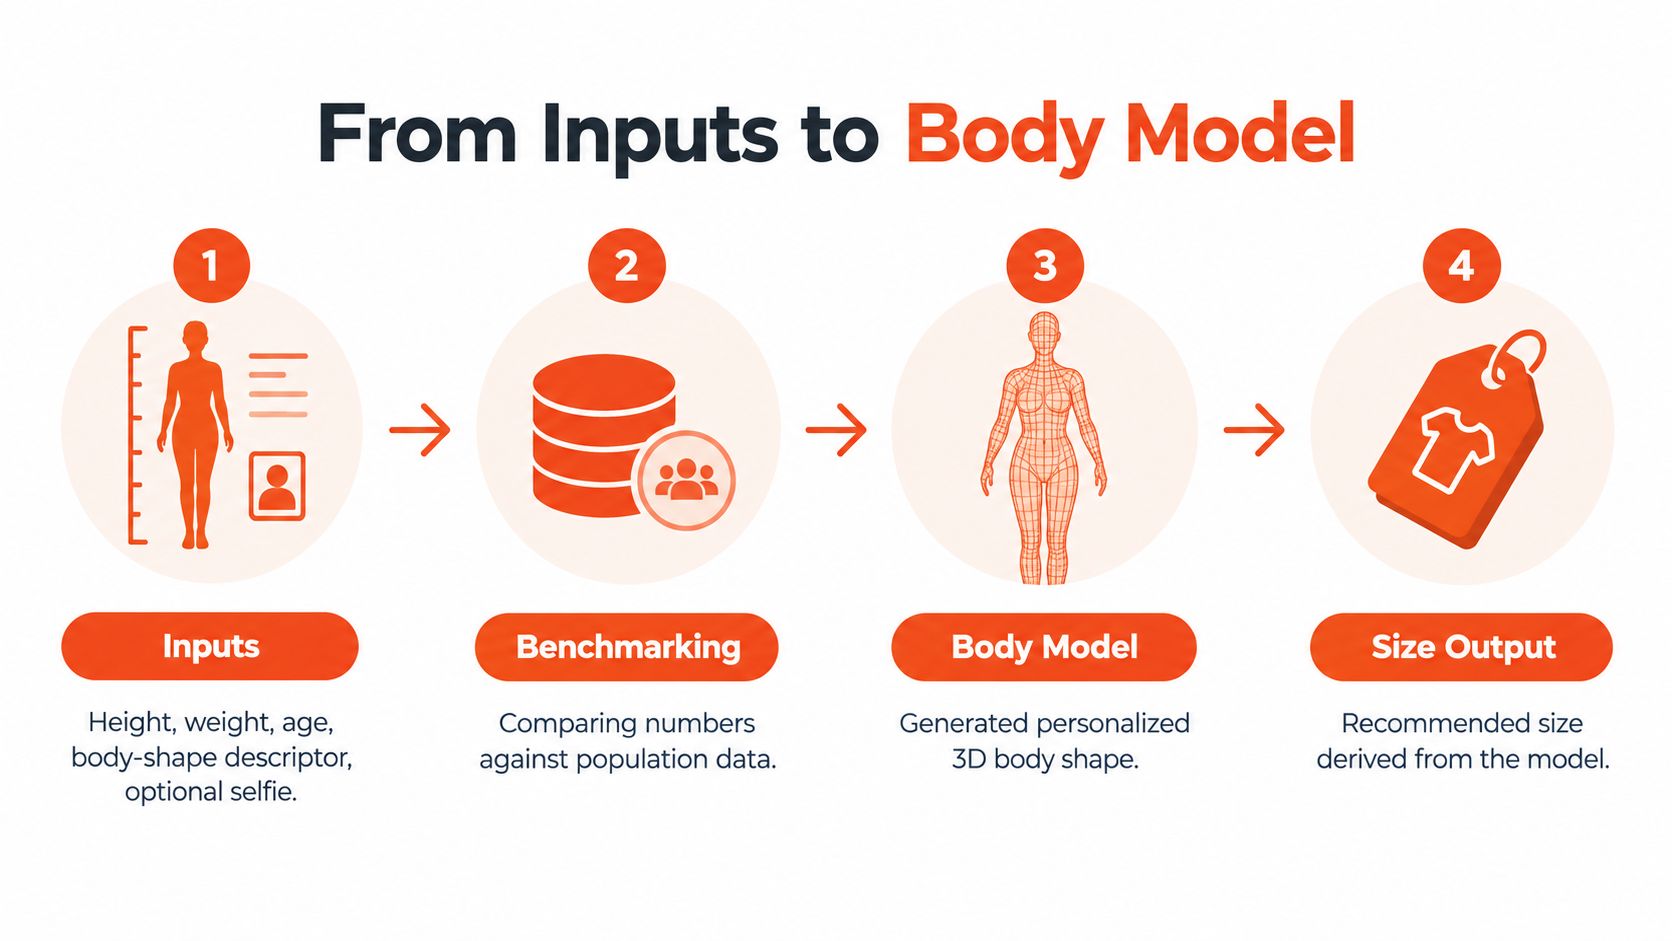
A shopper clicks “Try On,” enters their details, and sees a preview beside a suggested size. Those outputs come from different stages of the same process. For a retailer configuring the feature on a Shopify product page, understanding that sequence helps explain what each input contributes.
From shopper details to a personalized preview
The tool first collects height and weight, sometimes alongside age, a body-shape descriptor, or additional measurements. These inputs form a starting estimate, much like an outline that needs more detail before it represents a particular person. Height and weight establish overall scale; shape information helps adjust proportions within that outline.
The shopper may also choose a selfie or a model-based preview. That choice determines how the result is presented. Uploading an image can make the preview feel more personal, while selecting a model offers a route that requires no photo. Neither choice should be presented as proof that the garment will fit.
Next comes a plausibility check. Population measurements, such as those documented in the CDC anthropometric report, provide context for evaluating an estimated body model. They remain reference measurements rather than an individual fitting assessment. The human body scanner overview explains the relationship between body measurements and digital models.
The platform then generates the model and renders the garment on it. Where multiple viewpoints are available, shoppers can inspect the side silhouette and drape as well as the front view.
From model to product size
The size recommendation needs a separate connection to product data.
The system compares the estimated body dimensions with garment measurements and the retailer's sizing information. Its output should identify an available size for that product, with the intended fit explained alongside it. A visible size chart gives shoppers a way to check the guidance and apply their own preference for a closer or roomier fit.
| Input | Pipeline stage it feeds | What it changes in the output |
|---|---|---|
| Height and weight | Initial body estimate | Overall scale and starting proportions |
| Age and body-shape descriptor, where supported | Body-model adjustment | Estimated regional shape |
| Selfie or selected model | Visualization | Whether the preview is image-based or model-based |
| Product measurements and size chart | Fit recommendation | Which available product size the system suggests |
Why Height and Weight Alone Are Not Enough
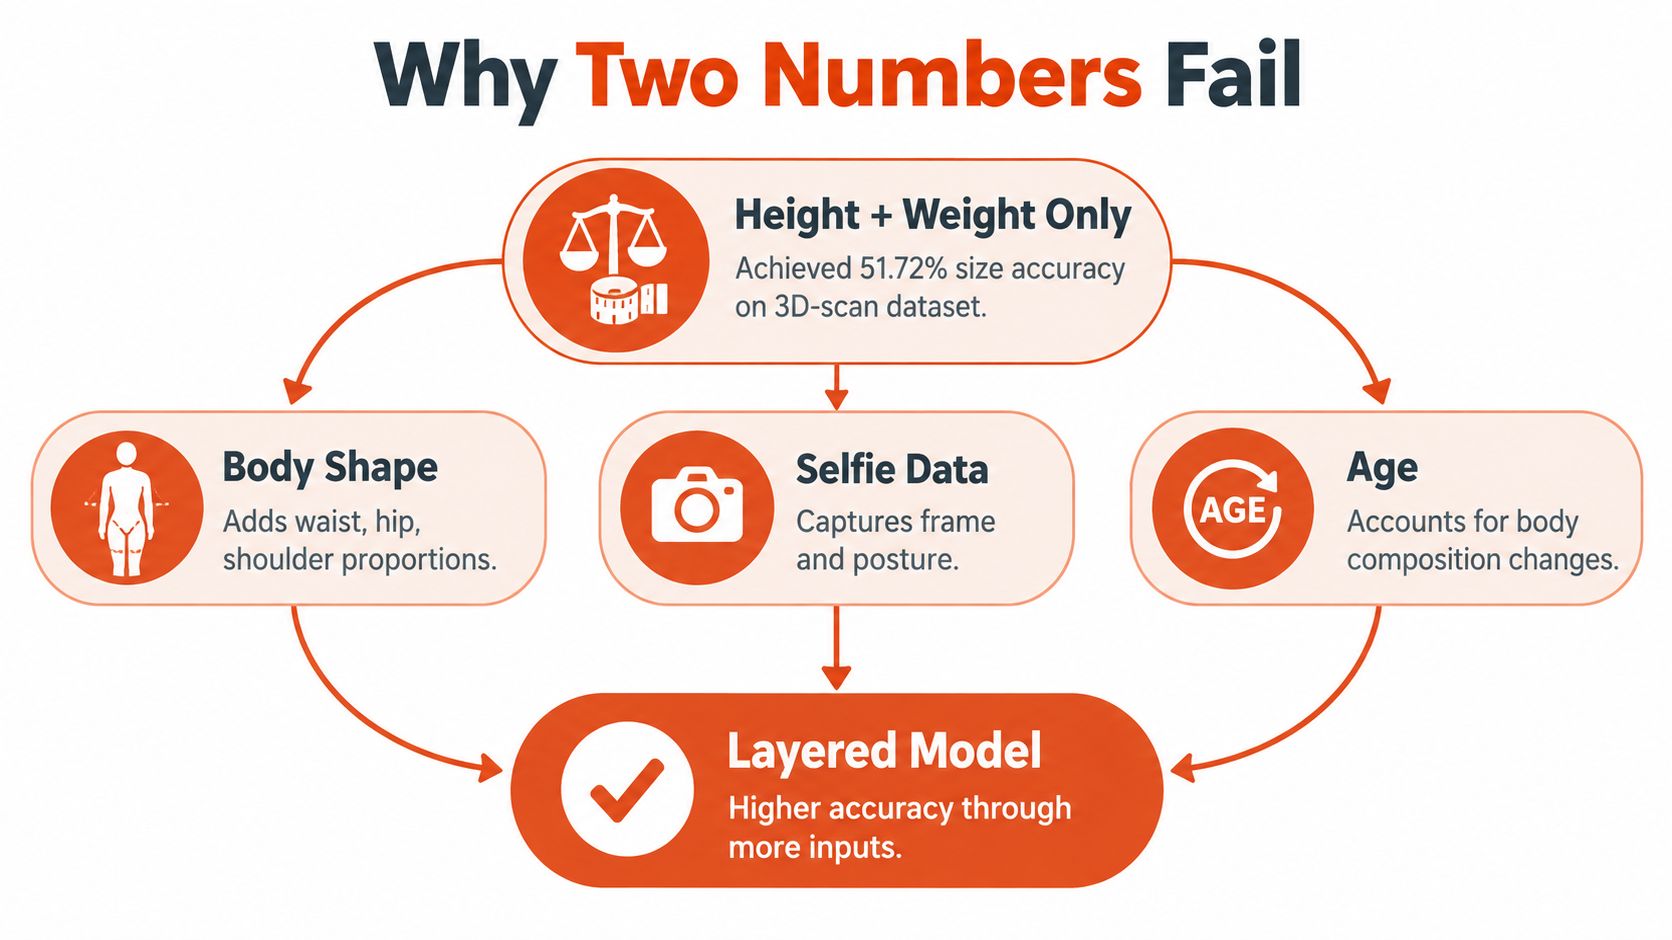
Two shoppers enter the same height and weight into a visualizer. One has broader shoulders; the other carries more of their shape around the hips. The same starting estimate could look plausible for both, yet their clothing needs differ. Height and weight describe overall scale, much like a parcel's dimensions and weight leave its contents unclear.
The limits show up in sizing research. A 3D body-scan sizing study published in 2025, using data from 677 women, reported 51.72% clothing-size accuracy from height and weight alone, compared with 89.66% using bust, waist, and hip measurements, while 35.45% of participants fell outside every predefined size category.
Those results describe that study's models and participants; they are no guarantee of accuracy for a retailer's tool.
For retailers, the practical response is to allow body-shape estimates to become more specific as shoppers provide relevant information. Shoulder width, torso length, and waist-to-hip proportions can help explain why similar overall measurements produce different fits. Keeping estimated dimensions continuous avoids squeezing every shopper into a fixed avatar category. The Bridle Up Hope Shop fit guide offers a garment-focused perspective on how body shape affects clothing choices.
BMI describes a relationship between height and weight
BMI divides weight in kilograms by height in meters squared. The WHO BMI definitions classify adults with a BMI of 25 or above as overweight and 30 or above as obese. These classifications provide screening context. They cannot establish an individual shopper's body composition, silhouette, or clothing size.
A useful visualizer keeps visual body generation separate from size recommendation. Whether shoppers choose a selfie or a model, the preview still needs garment measurements, cut, and fit preference to support sizing guidance. A clothing size comparison guide helps explain why the same label can mean different measurements across brands and products.
On the product page, uncertainty should remain visible. If the available inputs leave two sizes plausible, show both and explain how a closer or roomier fit affects the choice.
Selfie Try On Versus Model Based Preview
The choice between a selfie and a selected model comes down to personal relevance versus convenience. A selfie-based preview can feel more closely connected to the shopper's own appearance, while a model-based preview lets someone see a garment without uploading an image.
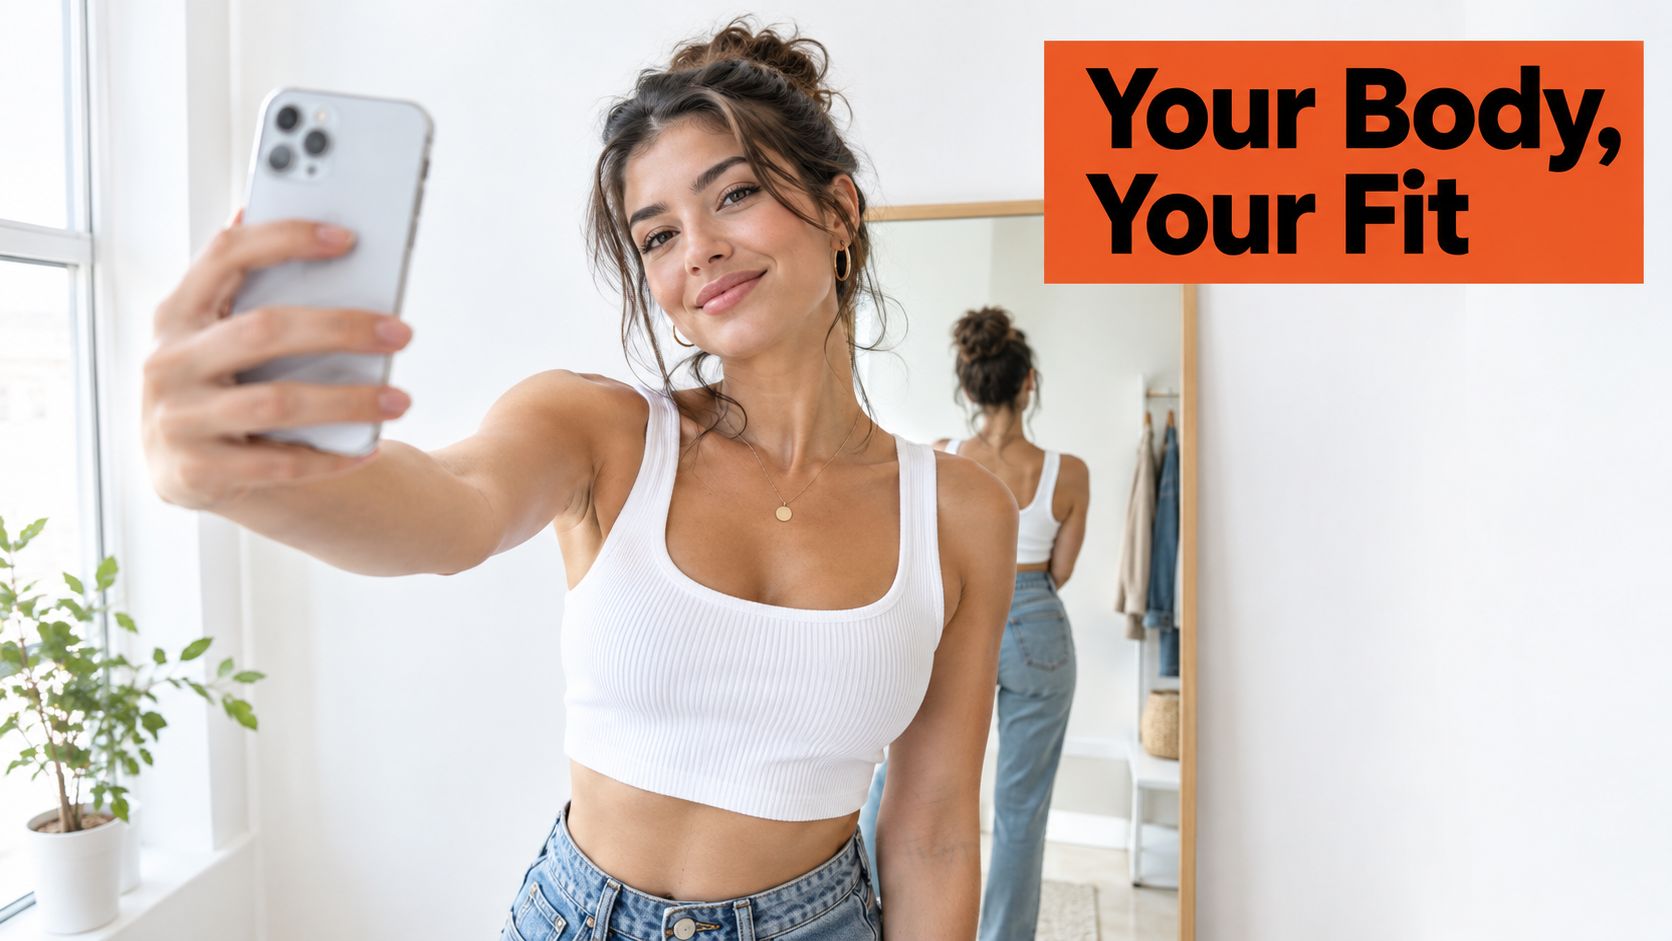
Selfie try-on can be a good fit when shoppers want a more personal visual reference and are comfortable using a camera. But it adds a decision: whether to share an image. A clear explanation of how images are used, alongside an option to continue without one, can reduce unnecessary friction.
A model-based preview suits shoppers browsing in public, shopping quickly, or buying for someone else. It won't look exactly like the intended wearer, but it can still show how the garment is represented on a body shape selected by the shopper. Retailers can offer both paths without building two separate sizing systems if they use the same product data and size recommendation underneath.
The experience can also show the difference between the two paths in a short introduction. A video can help retailers think about how visual try-on is presented to shoppers:
| Dimension | Selfie-based try-on | Model-based preview |
|---|---|---|
| Personal relevance | Uses the shopper's image for a more individualized visual | Uses a selected model rather than the shopper's image |
| Shopper effort | Requires camera access and an image | Can begin without taking or uploading a photo |
| Privacy questions | Needs clear image-use information | Avoids selfie-upload concerns |
| Useful for | Shoppers seeking a more personal preview | Public browsing, quick decisions, or gift shopping |
Don't assume one option should be the default for every catalog. If image upload is likely to feel intrusive, lead with model selection and make selfie try-on optional. If shoppers value a personal preview, offer the selfie path without making it a condition for getting a size suggestion.
Inside the On Page Experience Shoppers Actually Use
A fitting tool can have advanced modeling behind it and still fail if the product-page experience feels slow or confusing. Shoppers need to understand what to do, what they'll see, and how the result relates to the size selector.
Start with a short questionnaire that asks only for information the tool will use. Explain measurement units plainly and let shoppers switch between metric and imperial. That small choice can prevent data-entry mistakes, especially when a shopper is entering familiar measurements from memory.
Once the shopper submits the answers, show the body preview and the garment together. If the tool offers multiple views, make the controls obvious. A front view can help with overall appearance, while a side or angled view may make drape and silhouette easier to assess. The value is not the number of views by itself, but whether each one helps answer a shopper's fit question.
The size card should close the loop. It needs to name a size available for the product, make the recommendation easy to find, and explain what the shopper can do if they prefer a tighter or looser fit. If the system can offer an alternate size, label it as an option rather than burying it in a separate chart.
Practical rule: Keep the recommendation close to the product's size selector. A shopper shouldn't have to remember a result from a separate page while choosing what to add to the cart.
Retailers should also check how the feature behaves on mobile, where shoppers may be using a camera or entering measurements on a small screen. A guide to how AR boosts mattress conversions offers a related example of how visual product information can support online buying decisions.
Before launch, walk through the page as a shopper: open the tool, enter inputs, switch units, review the preview, compare the recommendation with the size chart, and return to the product controls. Each handoff should feel clear. If shoppers have to guess what the output means, the visualizer hasn't finished its job.
What Retailers Actually Gain from Adding One
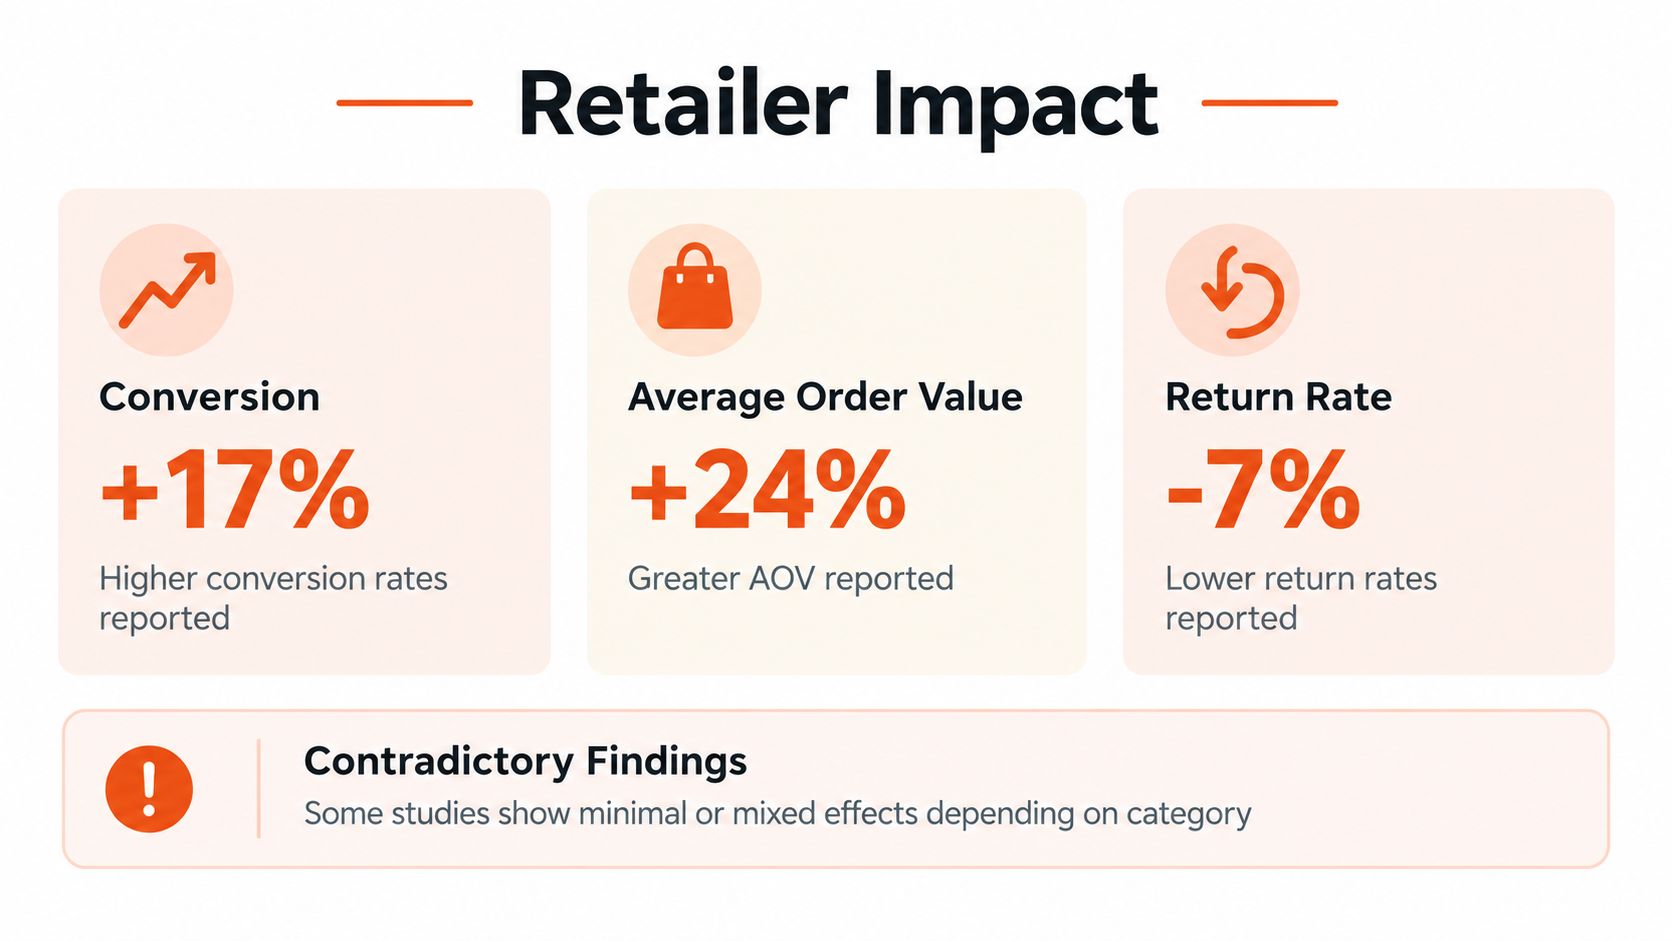
Retailers often evaluate a visualizer by looking for changes in conversion, average order value, and returns. Those are reasonable outcomes to monitor, but they shouldn't be treated as guaranteed results. Reported case-study outcomes associated with Robosize include 17% higher conversions, 24% greater average order value, and 7% lower return rates. These figures are claims about reported outcomes, not promises that every store will see the same effects.
A different finding urges caution. One reported large-scale study found that personalized advice improved conversion, add-to-cart activity, and revenue per visit, but the reduction in size-related returns was below 0.5% and statistically insignificant (coverage of fit algorithms and fashion returns). Results can vary with product category, size-chart quality, brand grading, and the reasons customers return items.
Measure decision support, not just returns
A visualizer can help a shopper choose between sizes, but it can't fix every reason for a return. Fabric feel, an unexpected color, a change of mind, a gift purchase, or inconsistent size grading can all affect the outcome. Retailers should measure whether shoppers use the tool and whether it helps them make a decision, alongside broader business outcomes.
Usage and recommendation analytics can also help merchandising teams identify product pages where shoppers appear to need more fit guidance. If a particular garment generates repeated size uncertainty, the underlying issue might be incomplete product measurements, a confusing size chart, or a cut that needs clearer explanation.
For a careful rollout, compare tool usage and product performance against the store's existing experience. Treat conversion and return changes as results to investigate, not proof that the tool alone caused them. A more honest goal is to make fit information easier to understand and let shoppers buy with better context.
Implementation Paths and Merchant Best Practices
Retailers can add a height weight visualizer in different ways depending on their ecommerce platform. Shopify stores can use a one-click app, while stores on other platforms can install a JavaScript snippet. The setup path affects installation, but the quality of the experience depends on the product data and settings behind it.
Before launch, decide how the tool should look on the product page and which products should use it. Retailers can customize its appearance to match the storefront, upload size charts, and match those charts to products. They should confirm that each garment points to the correct chart rather than assuming one chart applies across the catalog.
Think through how shoppers will use the feature, too. The questionnaire should remain focused, and selfie upload should be optional. Make unit switching visible, provide alternate size options when appropriate, and explain any usage limits in plain language. If the platform offers session caps or overage controls, treat them as spend-management settings, not as a surprise barrier shoppers encounter mid-try-on.
Use a launch checklist before enabling the tool across the catalog:
- Product mapping: Confirm each item is connected to the right size chart.
- Input flow: Test the questionnaire and make sure shoppers can use either measurement system.
- Preview choices: Check both the selfie and model-based routes.
- Fit output: Verify that recommendations match sizes available for the product.
- Appearance: Review the tool on desktop and mobile to ensure it fits the storefront.
- Usage settings: Understand session allowances, caps, and any overage pricing.
A visualizer can also make fit questions easier to investigate, but it won't remove every point of friction in online shopping. Retailers reviewing broader online shopping issues should treat the try-on feature as one part of the product-page experience, alongside accurate photos, measurements, and clear policies.
Privacy, Accuracy, and What Shoppers Should Be Told
A shopper reaches the selfie upload screen and pauses. Is the photo required? Will it be stored? Answer those questions before the camera opens. Explain what information the tool collects, how it uses that information, and where shoppers can read the store's data practices. Make the model-based option visible so the shopper can choose without uploading an image.
Height and weight are a starting point, like the first outline of a drawing. Body-shape inputs add detail, while garment measurements connect that outline to a particular product. Explain which inputs support the preview and size recommendation so shoppers understand what they are seeing.
Label the recommendation as an estimate. If nearby sizes are plausible, explain the choice in terms of fit preference: “This size is suggested for a closer fit.” Shoppers should be able to choose a more relaxed fit without treating the initial suggestion as a rule.
Be clear about what the tool can and can't solve
A visualizer can help shoppers interpret a size chart or compare product measurements with their body. Fabric behavior, differences in garment grading, and personal preferences still affect how clothing feels when worn. A preview cannot settle every return decision, including gifts or changes of mind.
BMI categories need particular care. WHO guidance on BMI gives adult thresholds of under 18.5, 25 or above for overweight, and 30 or above for obesity, while noting that body proportions can make the relationship between BMI and body fat vary across populations. These screening categories should never be presented as silhouettes or clothing-size measurements.
Review the promise as closely as the interface.
Check whether the preview communicates uncertainty, whether product measurements support the suggested size, and whether shoppers can understand and change the recommendation. Privacy explanations should describe the tool's actual practices rather than offer vague reassurance.
Robosize offers an on-page virtual fitting room using shopper inputs and an optional selfie or model selection to generate a body preview and product-specific size recommendation. Retailers considering Robosize should assess how that experience works with their product data and size charts, and explain its limits alongside its benefits.