You're preparing a new apparel collection, but the imagery isn't ready. Some color samples haven't arrived, the jacket photographs don't match the knitwear, and shoppers still can't tell how a garment might look on their body. Another photoshoot would solve part of the problem, but not all of it.
Photorealistic product rendering offers a different production method: build the product digitally, then create images from that asset. The useful question isn't whether the result looks impressive. It's whether the image faithfully represents the merchandise, loads comfortably on a shopper's phone, and helps them make a better purchase decision without overstating what the technology knows.
Table of Contents
- What Photorealistic Product Rendering Is
- Lighting, Materials and 3D Models That Make a Render Believable
- Choosing On-Device, Server-Rendered or Real-Time Delivery
- Color Management and File Delivery for Accurate Renders
- Image Angles and Multi-Angle Requirements by Product Type
- Where Renders Pay Off in Conversion, Returns and Catalog Cost
- Disclosing AI Imagery Without Losing Shopper Confidence
- Accuracy Limits and When a Render Should Not Be Trusted
- Pilot One Product Family Before Scaling Rendering
What Photorealistic Product Rendering Is
Photorealistic product rendering is a computer-generated product image built from a 3D model and simulated light, designed to look like a studio photograph. A physical sample doesn't have to sit in front of a camera for the image to exist.
Think of a virtual film set. A digital sweatshirt occupies the set, while an imaging specialist positions the camera, adjusts the lights, and assigns fabric properties. Changing the viewpoint doesn't require moving a mannequin, and changing the color doesn't require another sample.
The basic process looks like this.
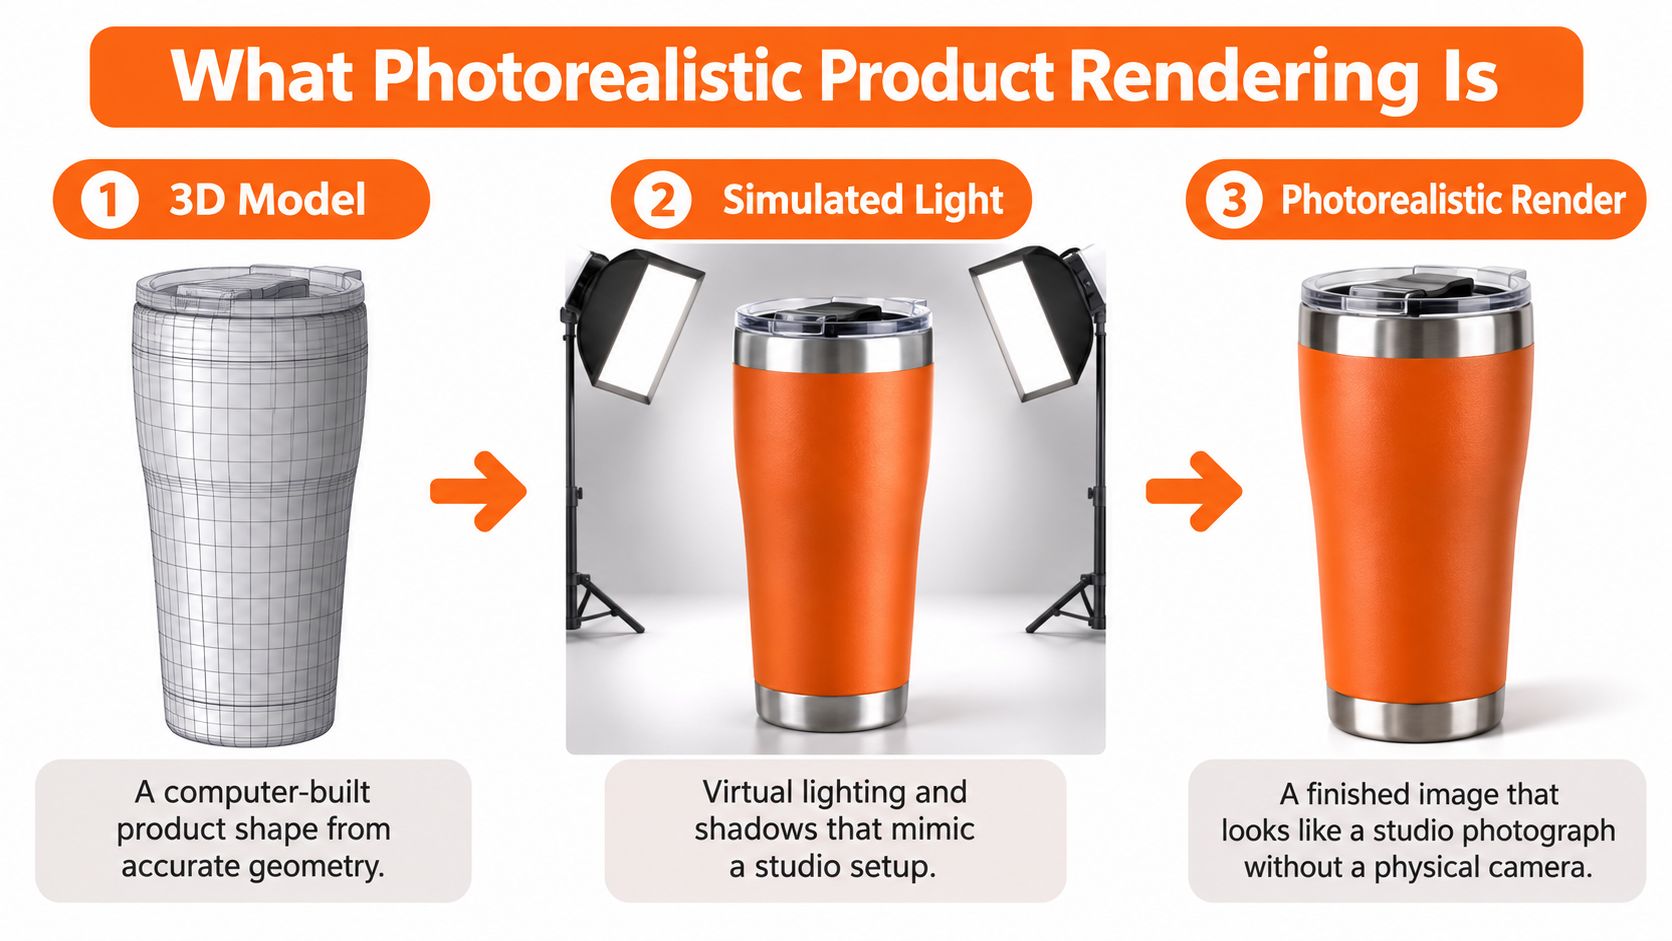
From simulated rays to a believable product
The computer-graphics history hosted by Carnegie Mellon University traces the progression from Arthur Appel's 1968 ray casting, through Turner Whitted's 1980 ray tracing for reflections, refractions, shadows, and smoother edges, to Immel and Kajiya's 1986 rendering-equation work on global illumination, with 1995's Toy Story demonstrating fully computer-generated imagery at feature-film scale.
Global illumination means simulating light bouncing between surfaces. It helps explain why a fold isn't black inside: surrounding surfaces send light into it.
For a store, the practical benefit is a reusable asset that supports consistent colors, angles, and environments. Before budgeting, Picjam's resource to calculate ROI for AI fashion photography can help organize the comparison, provided you distinguish photography tools from a true 3D workflow.
Quick identification test: Ask whether the image came from a 3D asset with simulated physical lighting or from editing a photograph of a real sample. A realistic appearance alone doesn't identify the production method.
Lighting, Materials and 3D Models That Make a Render Believable
A convincing garment render needs accurate geometry, appropriate materials, and coherent lighting. A weakness in any of these can make an otherwise polished image misleading.
This diagram separates the layers you should inspect.
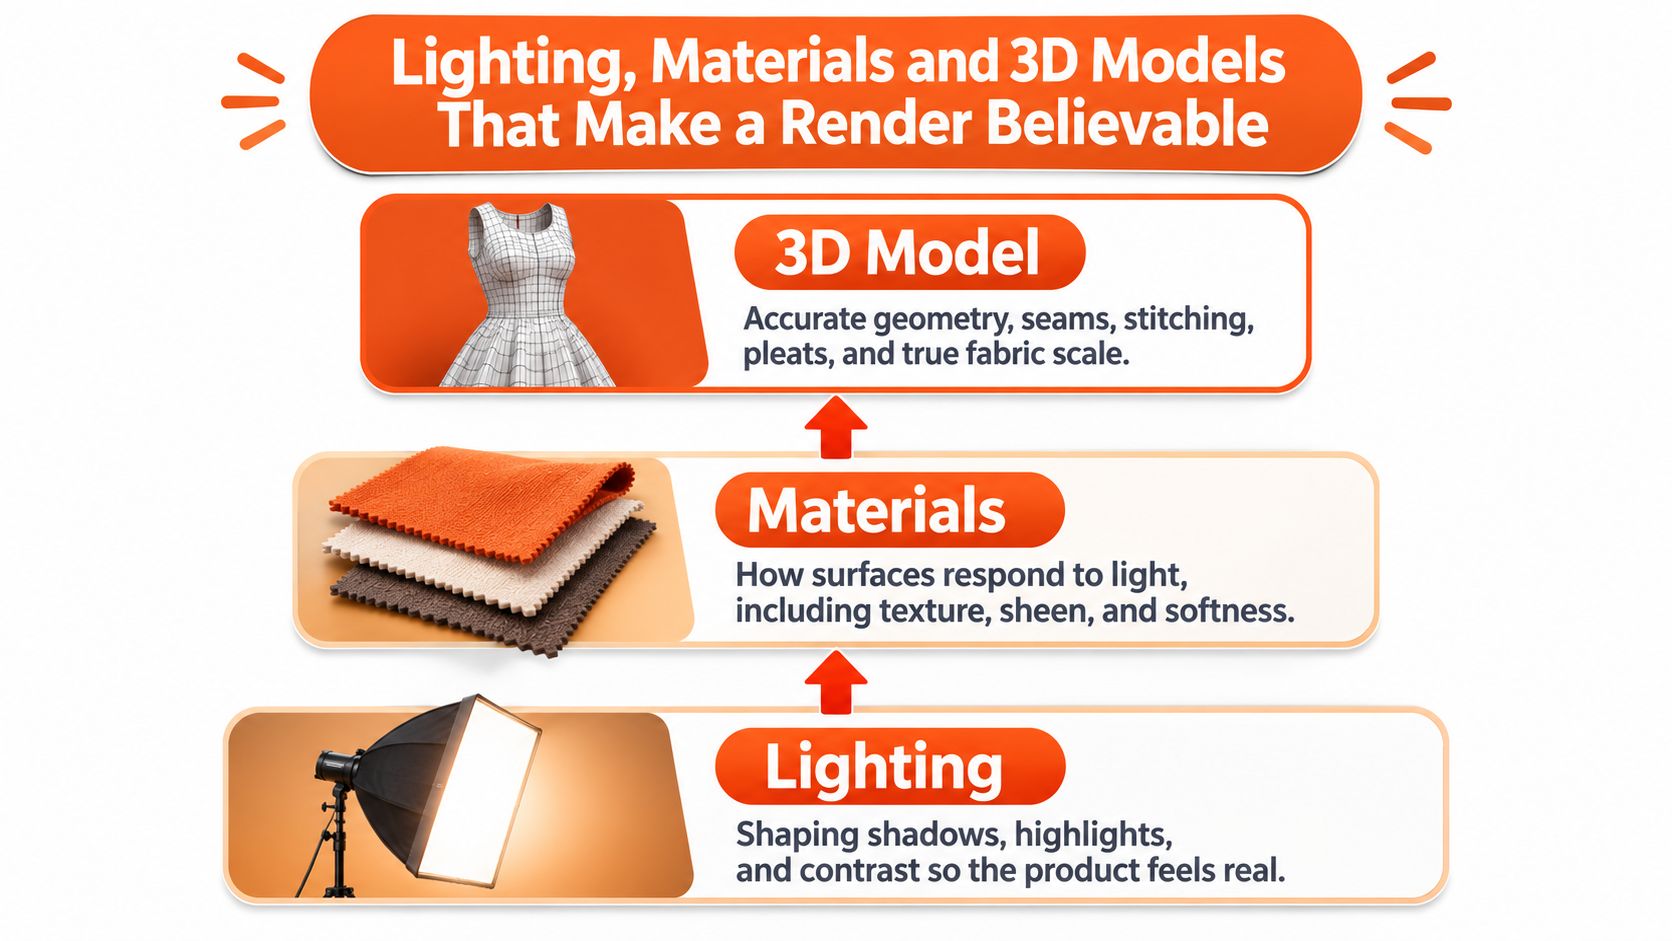
Geometry and materials establish the product
The 3D model describes shape. For apparel, that includes seams, collar thickness, pleats, cuffs, and the placement of stitched panels. Fabric patterns also need the correct scale: an oversized knit texture can make an adult sweater resemble miniature clothing.
Materials describe how that shape responds to light. Common physically based controls include:
- Base color: The underlying surface color, separate from lighting and reflections.
- Roughness: How broadly a surface spreads reflected light. Matte cotton needs a different response from glossy synthetic fabric.
- Metallic response: Appropriate for exposed metal hardware, not a shortcut for making ordinary textiles shiny.
- Normal or displacement detail: Surface information that suggests fine texture or changes the modeled surface.
Say a black training top looks like molded rubber. The problem might not be its color. Its roughness may be too low, its weave detail too smooth, or its geometry too rigid.
For a practical workflow reference, AdCrafty's guide to how to render 3D product models can help you turn those inspection categories into production tasks.
Lighting and reconstruction determine the finish
Ray tracing calculates light paths through a scene. Area lights can produce soft shadow transitions, while indirect light helps reveal folds that face away from the main light.
Ray-traced ambient occlusion, the shading associated with nearby surfaces blocking surrounding light, can account for geometry outside the screen. Screen-space approximations can instead leave conspicuous dark halos near edges.
A denoiser reconstructs a cleaner image from noisy rendering calculations. NVIDIA's explanation of real-time ray tracing describes high-quality denoising with 1–2 samples per pixel, using signals such as roughness and light-hit distance. That's a capability under suitable conditions, not a universal quality guarantee.
Inspect the moving experience, not just a selected frame:
- Fine boundaries: Check hair, thin straps, and garment edges for disappearing detail.
- Reflective details: Watch sequins and glossy logos for unstable highlights.
- Motion consistency: Look for smearing after a camera or body movement.
- Product identity: Confirm that reconstruction hasn't softened stitching or changed a print.
When assessing the technical workflow behind shopper visualization, use the same checks you'd apply to any rendering pipeline. Attractive lighting shouldn't hide incorrect construction.
Choosing On-Device, Server-Rendered or Real-Time Delivery
Delivery approaches for photorealistic product rendering
| Approach | Where the render is produced | Typical speed to shopper | Best fit | Main trade-off |
|---|---|---|---|---|
| On-device | Shopper's phone or browser | Fast interaction after the initial asset load | Mobile viewers with small, optimized assets | Limited by device graphics hardware, memory, and battery |
| Server-rendered | Store or vendor cloud servers | Pre-generated stills load as images; new renders require processing and delivery | Large catalogs and high-fidelity product stills | Network transfer and server processing cost |
| Real-time | Browser, app, or streamed rendering service, updated frame by frame | Must respond quickly enough to track the shopper's interaction | Live camera try-on and interactive angle viewers | Sustained processing demand and reconstruction artifacts |
These aren't completely separate categories. On-device and server-rendered describe location; real-time describes behavior. An on-device viewer can operate in real time, and a server can stream an interactive experience.
Match the workload to the shopper
Start with your catalog and variant count. A large assortment that mainly needs fixed product-page views is a strong candidate for pre-generated stills. Shoppers receive ordinary image files rather than waiting for a new scene to render whenever they open a listing.
Next, examine the devices your customers use. An on-device experience avoids a rendering-server round trip after assets arrive, but the phone must still download, decode, and display the model. A beautiful desktop demonstration doesn't establish acceptable performance on a mid-range handset.
Finally, identify the interaction shoppers need. Selecting a prepared colorway is a different workload from following a moving person through a live camera feed. Browsing a new-look visualization experience can help your team define the intended interaction before choosing the infrastructure.
Use a hybrid when the tasks differ
A footwear store might serve server-rendered hero images while offering an optimized on-device viewer for inspecting the heel and sole. To think through customization interactions, explore digital bespoke footwear from Alexander Noel and identify which choices need immediate visual feedback rather than another prepared image.
Choose delivery around the buying task, not around the most technically ambitious demonstration.
Prototype a representative product across the candidate approaches. Test on a mid-range Android phone and an iPhone using the storefront's normal delivery path.
Record first-view time, transferred file size, interaction responsiveness, and visible quality. Include repeat visits as well as first visits, because cached assets can disguise a heavy initial download. Approve the approach that fits your performance budget without removing details shoppers need.
Color Management and File Delivery for Accurate Renders
Color management is part of product accuracy, not a finishing filter. A technically convincing fabric can still disappoint shoppers if the delivered file changes its color or hides detail in dark folds.
Display P3 is a wide-gamut RGB color space, meaning it can represent a broader range of colors than some common display workflows. The International Color Consortium's Display P3 specification defines its D65 white point and transfer function, with a reference viewing environment of 80 cd/m² white-point luminance and 64 lux ambient illumination.
Those reference conditions aren't a promise about how every shopper's screen will look. They give your team a defined basis for evaluation.
Keep the color pipeline explicit
- Establish a physical reference. Photograph a material swatch under controlled lighting, with a neutral reference in the setup. Compare the render against that reference rather than a merchandising screenshot.
- Calculate lighting in linear color space. Linear calculations preserve the intended mathematical relationship between light contributions.
- Apply the output transform at export. Use Display P3 where your storefront supports it, without treating a display-ready image as linear scene data.
- Embed the color profile. Verify the delivered file, not just the original export.
- Inspect the full delivery chain. Check whether your content delivery network, image optimizer, or resizing service preserves the necessary color metadata.
Prepare files for actual browsing conditions
- Fallback output: Supply a tagged sRGB version for broad compatibility.
- Predictable naming: Include the SKU, colorway, view, and output space in the asset record.
- Device validation: Compare Android and iPhone output, paying attention to saturated colors, neutral textiles, and shadow detail.
- Consistent transforms: Keep the catalog image and interactive preview aligned rather than grading them independently.
Don't correct a material merely because it looks dull on an uncalibrated monitor. Check the reference, profile, and output transform before changing the product itself.
Image Angles and Multi-Angle Requirements by Product Type
Minimum angles and views by product type
Use these as recommended starter sets, not as a universal platform requirement.
| Product type | Minimum angles | Add a view when | Shooting note |
|---|---|---|---|
| T-shirts and knitwear | Front, back, side, three-quarter | Drape at the hem and sleeves matters | Show a flat-lay and a worn view |
| Dresses and skirts | Front, back, side, three-quarter | Length and movement matter | Add a stance or walking image if available |
| Outerwear and jackets | Front, back, side, closure detail | Layering and structure need explanation | Photograph the collar and lining |
| Footwear | Side, top, sole, heel | The last shape and heel height need clarification | Use a neutral background and consistent height |
| Sportswear and jerseys | Front, back, side | Stretch and compression need explanation | Include a stretch or fit reference |
| Bags and belts | Front, side, hardware detail | Strap length and scale matter | Include a scale reference in frame |
A front view establishes the silhouette, but it can conceal the information that changes a purchase decision. A side view reveals a dropped shoulder or projecting pocket; a back view shows a vent, yoke, or print placement.
For footwear, the last is the form around which the shoe is shaped. A rendered exterior can communicate its outline, but it doesn't establish internal comfort or fit.
Standardize capture before generating variants
Set the camera height, framing, lighting, and background for the product family before producing the angle set. Keep those choices stable so shoppers can compare products without interpreting changes in presentation.
Then prepare the reference package:
- Scale reference: Include a known-size reference in validation captures, even if it won't appear in the final hero image.
- Construction detail: Capture closures, collars, hems, and lining where they affect the purchase.
- Color swatch: Keep a photographed swatch with the approved product record.
- File identity: Use consistent view names so the storefront doesn't accidentally pair different angles or colorways.
Approve coverage rather than novelty
A 2024 study of leading fashion and clothing brands in Great Britain found no product listings with rotatable 3D views in the brands examined. That finding concerns a specific sample, not every fashion retailer.
You don't need rotation to provide useful coverage. A carefully chosen fixed view is more valuable than an interactive model that omits a closure or distorts the hem.
Before publication, have a staff member compare a representative rendered view with the physical product for proportion, construction, and color. A complete angle set isn't an approval if every view repeats the same modeling error.
Where Renders Pay Off in Conversion, Returns and Catalog Cost
The economic case starts with variants, not promises of higher sales. Physical photography requires sample coordination, preparation, lighting, capture, and retouching. A structured digital asset can reuse much of its setup when the team changes a colorway or camera position.
That doesn't make revisions free. New geometry, unfamiliar fabrics, and detailed quality assurance still require work. The useful comparison is total production cost per approved image, including asset creation and corrections.
A 2022 survey reported by Retail Dive found that 38% of respondents already used CGI extensively, while 52% planned to invest in next-generation product imagery during 2023. These are survey respondents' usage and intentions, not measured adoption across all retailers.
Build the business case from your assortment
Consider a hypothetical sweater offered in several colors, with a consistent view set for each. The photographer needs accurate sample coverage; the rendering team needs an approved model and validated material variations.
Compare quotes for the same deliverables. Include physical sample logistics on the photography side and model preparation on the rendering side. Don't assume every color requires a separate studio session, or that every digital color change needs no review.
ROI signals to measure before and after rendering
| Signal | How to measure it | Where to find it | Sign it is working |
|---|---|---|---|
| Conversion rate | Orders divided by product-page sessions | Storefront analytics | Rendered products outperform matched controls |
| Size-related return rate | Returns for size or fit divided by units sold, by SKU | Returns report filtered by reason | Fewer size-related returns than controls |
| Average order value | Mean order value associated with try-on use | Cart and order analytics | Higher value after accounting for shopper differences |
| Cost per image variant | Total production cost divided by approved colorway-and-angle outputs | Finance and creative budgets | Lower cost at the required quality |
| Time to update imagery | Elapsed time from approved change to live assets | Merchandising workflow records | Shorter turnaround without more corrections |
Separate association from improvement
Clearer views may reduce hesitation; more reliable size guidance may prevent unsuitable purchases. Treat both as hypotheses until your store measures them.
Shoppers who voluntarily use try-on may already be more engaged. Comparing them only with non-users can overstate the feature's effect. Use matched control products or a randomized eligible audience, and keep pricing, promotions, and stock availability comparable.
You can review the published Hombakazi Vintage Cabin case study for evaluation context, but a case study isn't your baseline. Calculate break-even using your own production costs, completed orders, and mature return outcomes.
Disclosing AI Imagery Without Losing Shopper Confidence
A Baymard survey of 2,273 U.S. online shoppers, reported by PetaPixel, found that 60% would feel less confident buying a product if its images were AI-generated, including 17% who wouldn't feel confident enough to buy at all. Photorealism and shopper trust aren't interchangeable.
A shopper may inspect an image closely and still wonder which details are real.

Describe the actual production method
Generative lifestyle imagery can create or change a scene, potentially altering garment details along with the background. Shopper-specific try-on has a different responsibility: preserve the product while simulating its appearance on a selected body.
Neither category should be confused automatically with a conventional, physically based 3D render. Label the method you used rather than applying an inaccurate AI label to every computer-generated image.
Keep verified product photography available and place the explanation near the simulated view. Suggested disclosure wording could read:
Rendered preview. This image simulates the garment on your selected model. Check the product photographs for construction details and use the size guidance separately when choosing your size.
Adapt that wording to the implementation. Don't claim a selected model is the shopper's measured body, or imply that visible drape has been physically validated when it hasn't.
For additional visual context, the following video can support your team's review discussion.
Make fidelity review a release requirement
- Seams and prints: Confirm their position, scale, and continuity.
- Transparency: Check that sheer fabric hasn't become opaque or unexpectedly revealing.
- Drape: Reject folds that contradict the garment's construction.
- Layering: Verify garment order, visible hems, and overlapping boundaries.
- Reference access: Keep authentic detail photographs easy to find.
Disclosure shouldn't carry the burden of excusing inaccurate imagery. Explain what's simulated, then make the product evidence accessible enough for shoppers to check it.
Accuracy Limits and When a Render Should Not Be Trusted
Visualization fidelity means how faithfully an image represents the garment. Size-recommendation accuracy means whether the recommended size will fit the shopper. A system can perform well at one task and poorly at the other.
A plausible-looking jacket doesn't prove the sleeve length or shoulder allowance is right. Conversely, a useful size recommendation doesn't guarantee that a generated preview reproduces every fold.
Yahoo Finance's reporting on virtual try-on limitations contrasts controlled measurement with consumer-image uncertainty and discusses a 2026 technical assessment that found no published fairness audit for try-on performance by skin tone or body shape. That's a boundary on the available evidence, not proof that every system performs unfairly.
Recognize conditions that weaken the result
An uncontrolled selfie introduces camera perspective, posture, lighting, and occlusion, meaning body regions hidden by clothing, hair, or other objects. Don't transfer a laboratory measurement claim to that input without equivalent validation.
Flag these conditions during testing:
- Oversized garments: Loose fabric can obscure the body outline and make intended ease difficult to infer.
- Compression wear: A convincing exterior doesn't establish pressure, support, or comfort.
- Structured tailoring: Shoulder construction, interlining, and shaping may not be captured adequately.
- Reflective fabrics: Highlights can conceal surface boundaries.
- Dark skin under poor lighting: Inspect exposure and boundary detection rather than treating skin tone itself as a failure.
- Loose hair and layers: Hidden shoulders, necklines, or waistlines can produce uncertain geometry.
Give shoppers a useful fallback
When input quality is weak, ask for a clearer image or another angle. Offer an alternative model selection for appearance browsing, but don't describe that substitution as a personalized fit assessment.
For size decisions, request measurement verification where needed and provide a readable size chart or garment-specific fit note. A message such as “Your shoulder outline isn't clear enough for this preview” is more useful than a generic failure notification.
A render should become less authoritative when the input becomes less reliable, even if the image still looks polished.
Test across the body shapes, skin tones, garments, and devices your customers use. Keep visual approval and size validation as separate acceptance decisions.
Pilot One Product Family Before Scaling Rendering
Use a bounded pilot to decide which parts of the workflow deserve a wider rollout.
- Choose a useful product family. Prioritize recurring fit complaints, multiple colorways, and enough sales activity to evaluate outcomes.
- Prepare the evidence package. Collect the approved angle set, physical swatches, construction details, and scale references. Assign someone to approve product fidelity.
- Select the delivery method. Consider catalog workload, customer devices, and whether interaction is necessary. For shopper-specific try-on, Robosize is an option to evaluate: we render up to three angles per session, and shoppers can complete their body model with a real-time phone or webcam selfie or pick a model.
- Approve shopper-facing language. Set disclosure wording and uncertainty prompts before release, not after a complaint.
- Run a controlled comparison. Keep matched products or audiences untreated, choose a test window that captures meaningful buying activity, and allow returns to mature before judging fit outcomes.
Set the rollout threshold in advance
If results are mixed, keep useful rendered stills while withholding interactive features that fail accuracy checks. Scale when the pilot demonstrates higher conversion or fewer size-related returns against controls, with acceptable production economics and no unresolved fidelity or disclosure problems.
Don't approve the entire system because a selected preview looks convincing. Approve the specific workflow your customers tested.
Robosize offers an AI virtual fitting room for online clothing stores, connecting photorealistic try-on with shopper-specific size guidance. Visit Robosize to request a live demo using your own products, and assess the garment details, viewing angles, and shopper experience against your pilot requirements.