Of 677 women measured in a 2025 body-proportion study, just 63 (about 9.3%) came out with the same clothing-size classification across bust, waist and hip. The other 614 (roughly 90.7%) landed in different size classifications depending on which measurement you checked, according to Scientific Reports. A size chart asks shoppers to collapse three or four numbers into a single label, and most bodies refuse the request.
Measuring carefully is the easy part. The step most charts skip is the conversion between the two sets of numbers any purchase involves: your body measurements and the finished garment's measurements. They aren't interchangeable, and the gap between them (ease, stretch, pattern shape) is where nearly every "I ordered my size and it doesn't fit" story starts. Understanding garment measurements vs body measurements is less about buying a tape measure and more about knowing which of the two numbers a chart is quoting.
Table of Contents
- Garment vs Body Measurements at a Glance
- How to Take Body and Garment Measurements
- Why a Matching Number Still Fits Differently
- Which Measurements Matter for Each Garment Type
- Common Mismatches and How to Fix Them
- When to Trust the Chart and What to Check Before You Order
Garment vs Body Measurements at a Glance
A body measurement describes you. A garment measurement describes the item in the parcel.
| Aspect | Body measurement | Garment measurement | Why it matters |
|---|---|---|---|
| Measures | The wearer's body | The finished product | Sets which number the shopper compares |
| Taken with | Tape on the body, fitted underwear | Tape laid flat on the item | Method changes the reading |
| Typical points | Bust, underbust, waist, hip, height, inseam | Width, total length, sleeve length, rise, outseam | Points rarely match one-to-one |
| Design allowance | Not applicable | Ease for movement, layers and style | Explains why the item is bigger or smaller than the body |
| Main use | Size chart intervals (ISO 8559 body tables) | Product page flat measurements | Shows what each chart is meant to answer |
One number tells you which body the manufacturer built the garment for. The other tells you how this particular piece was built. A chart full of body numbers answers "who is this for", while a row of flat measurements answers "what will arrive".
Size charts aren't garment dimensions in disguise. They're statistical intervals. ISO 8559-3:2018 sets out the method for converting body measurements collected from defined population groups into the size intervals manufacturers use for ready-to-wear, with separate category tables for women, men, girls, boys, infants and children. Build the interval, assign a label, and the label inherits whatever the population average looked like.
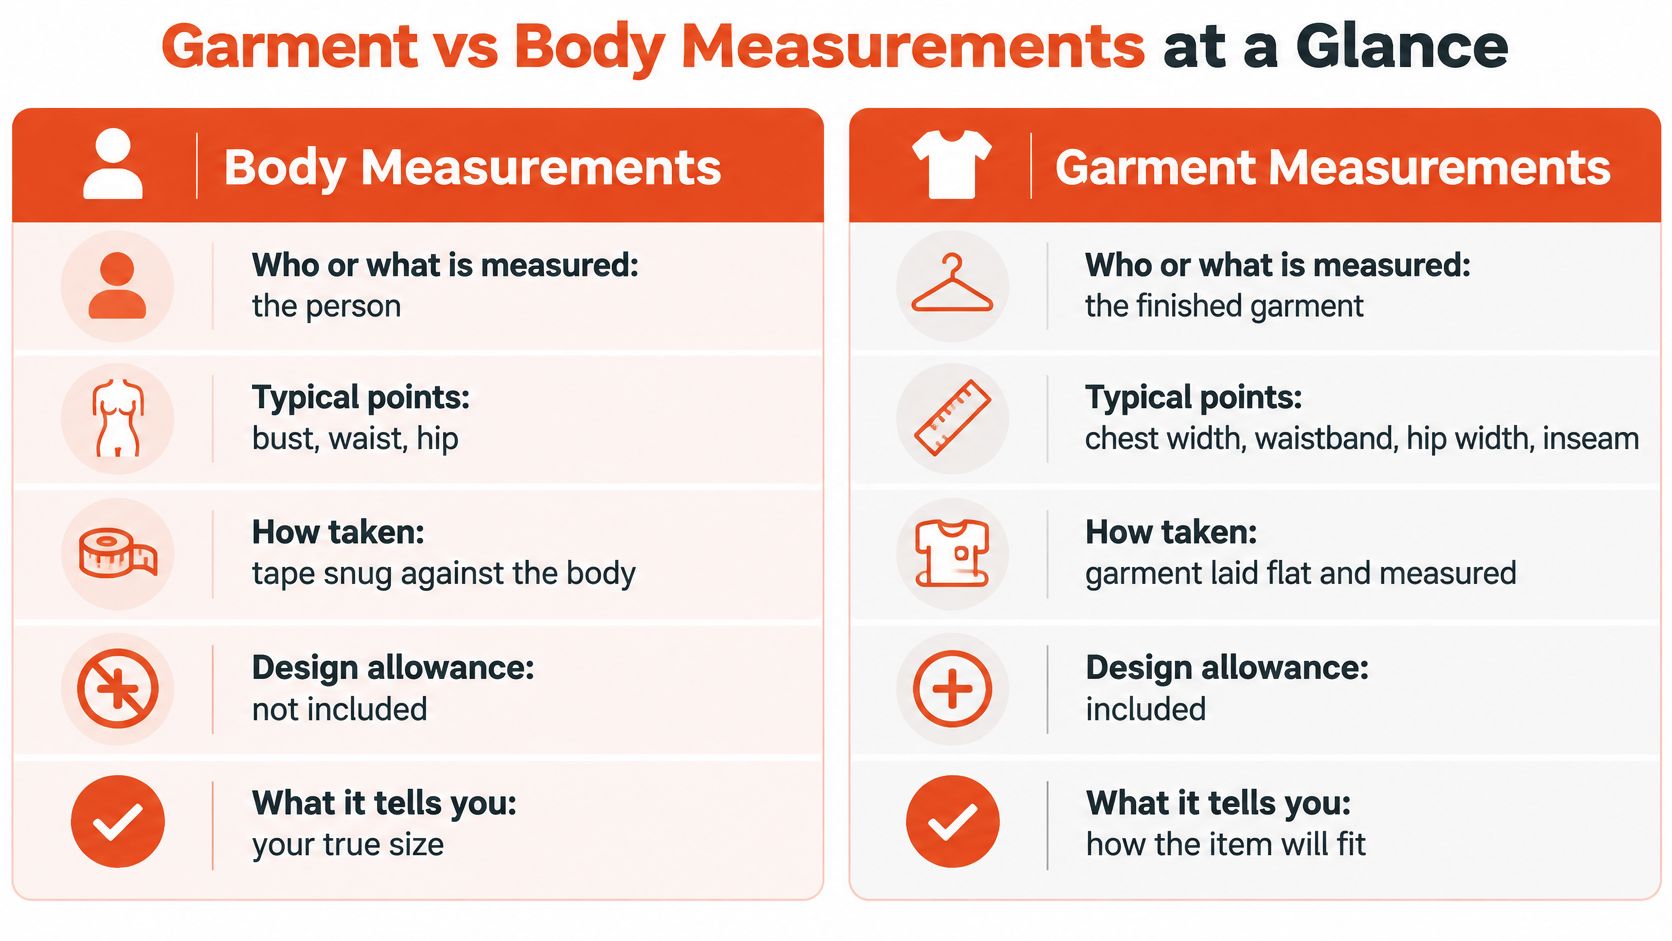
If the chart carries no label, read the point names. Body tables list things you measure on a person: bust, underbust, waist, hip, height, sometimes back length or inside leg. Garment tables list things you measure on an object: width across the chest, waistband width flat, total length, sleeve length from the shoulder seam, rise. A chart asking for "chest width" wants the item. One asking for "bust" wants you.
Before you buy, do three things. Find both sets of numbers on the page, confirm which one the size chart is quoting, and accept that a match on one point guarantees nothing about the others.
How to Take Body and Garment Measurements
Two routines, five steps each. Take both sets in the same session so the comparison is clean, and record everything in a single unit. Mixing centimetres and inches is the most common cause of a wrong order.
Measuring your body
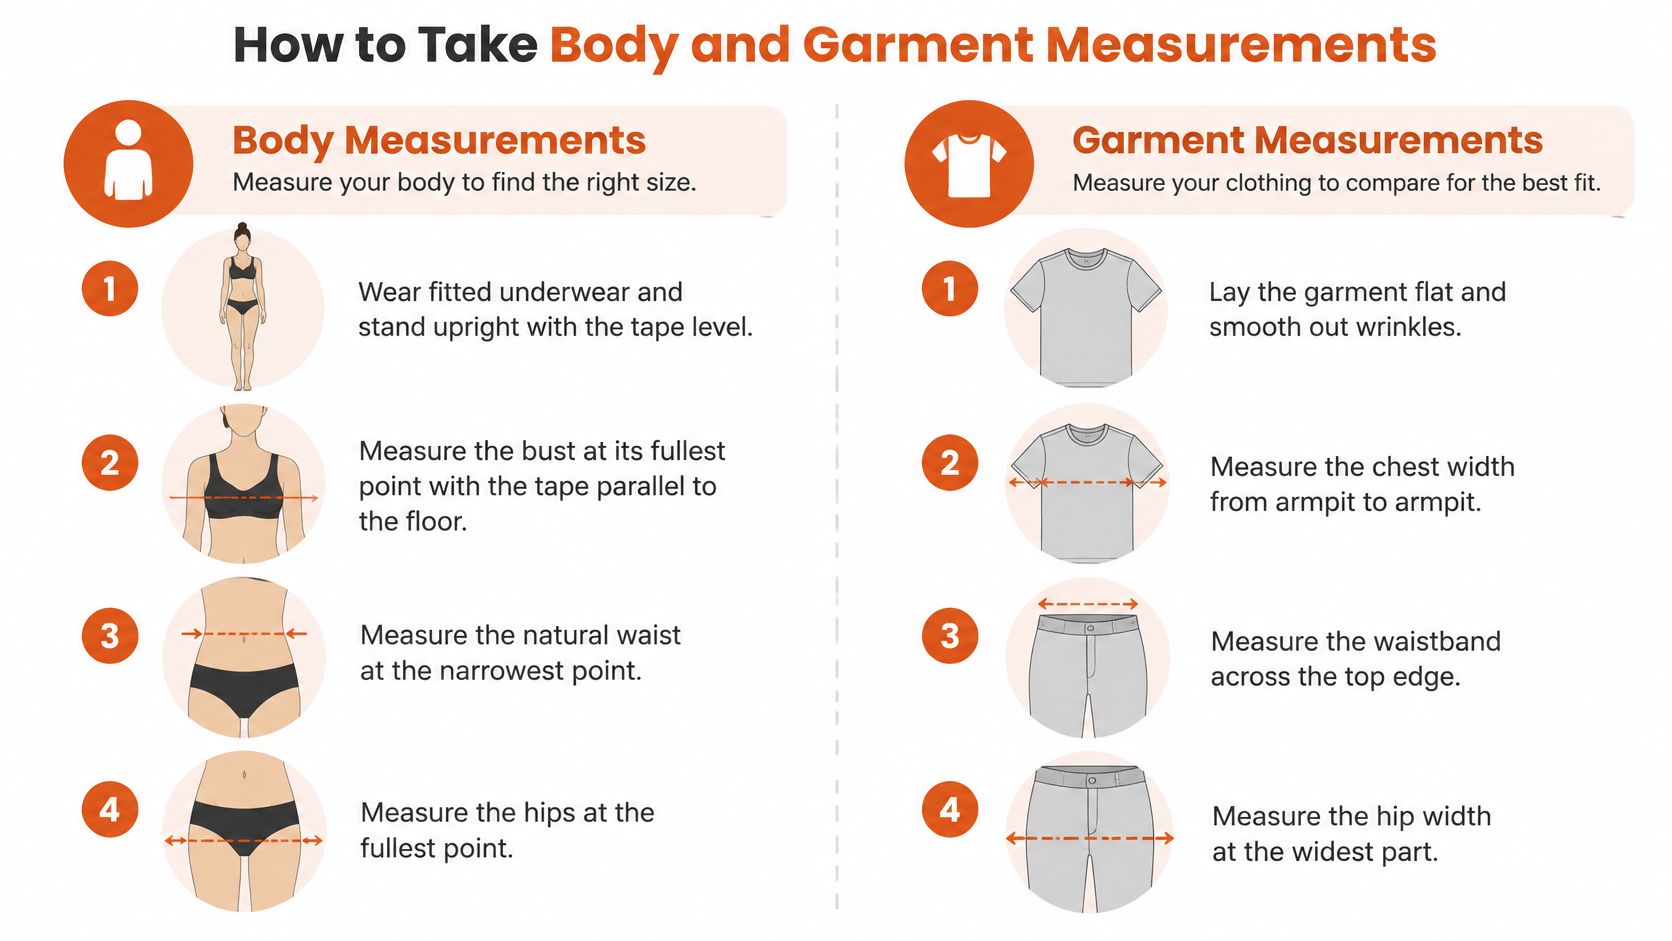
- Dress for the tape, not the mirror. Fitted underwear or a thin base layer, standing upright, tape level. Measuring over jeans and a sweater adds centimetres you'll then chase through two exchanges.
- Bust at the fullest point. Keep the tape parallel to the floor, snug without compressing. Angling the tape up at the back is the usual slip, and it reads small.
- Waist at its natural narrowest point. Bend sideways: the crease is the waist, not the waistband of your jeans. Breathe out normally rather than holding in, because a sucked-in waist buys a garment you can't sit down in.
- Hips at the fullest point, roughly 20 cm below the waist. Feet together, tape around the seat rather than the hip bones. Measuring high here is why fitted skirts pull across the front.
- Height without shoes, plus inseam if the chart asks. Measure the inseam from the crotch seam to the hem point you want, with the leg straight and the tape following the inside of the leg.
Measuring the garment
- Lay it flat and smooth it, don't stretch it. A table, a light pass with your hand, no tugging. Pulling a knit to meet the tape inflates the reading by a size or more.
- Chest width, armpit to armpit. Measure straight across the front, seam to seam, then double it if the chart quotes a circumference. Only one of those two numbers belongs in your comparison.
- Waistband width, flat and doubled. Same rule as the chest. If the band is elasticated, measure it relaxed and note that it will extend when worn.
- Total length from the high shoulder point to the hem. That's the highest point of the shoulder seam, not the collar and not the neckline.
- Sleeve from the shoulder seam to the cuff. On raglan or dropped-shoulder styles, measure from the nearest fixed point and write down where you started.
The same two-number logic runs through accessories. A compression sleeve is specified by circumference and length, and fit fails when only one of those is checked, which is why it pays to measure your knee correctly before ordering a knee sleeve instead of guessing from height.
Practical rule: measure twice, then write both columns on the same page. A body number and a garment number in different units are worse than no numbers at all.
Why a Matching Number Still Fits Differently
Two jackets both carry a label listing a 96 cm bust. One closes easily over a shirt. The other won't meet at the centre front. Neither chart lied.
Size designation is about the wearer, not the item. ISO 8559-2:2017 states that clothing size designation is based on the intended wearer's body measurements rather than the garment's finished measurements, using primary dimensions such as body height, bust, chest, waist or hip circumference depending on garment type, with secondary dimensions added where fit needs more precision. The standard's own reasoning is that a garment measurement must include design allowances for movement, layering, comfort, construction and style. A jacket measuring more than the wearer's chest isn't oversized, and trousers won't normally match a waist measurement exactly.
That allowance is the conversion step most charts leave out. Three things sit inside it.
Ease
Ease is the room built in above your body measurement. A snug knit sheath dress might be drafted with almost none; a relaxed blazer carries enough to clear a shirt and a light layer. Identical bust numbers on two labels, two very different garments.
Fabric behaviour
Stretch changes the arithmetic. A rib knit relaxes and recovers, so it can be drafted with less ease and still feel comfortable, while a woven linen with the same body numbers has no give at all. Two tops with identical flat chest widths can therefore behave completely differently in wear.
Pattern block
The block is the base shape the designer started from. A boxy block and a fitted princess-seam block can both carry the same circumference across the bust while distributing it in entirely different ways across the shoulder, armhole and back.
The reliable comparison is your body measurements against the garment's intended fit range, followed by a read of the ease or fit note on the product page. If the note says relaxed and the flat chest width sits well above your measurement, that's the design working as intended, not a chart that failed. When you're unsure which shape you're fitting into, a guide to male body types is a better starting point than another circumference, because shoulder-to-waist proportion decides whether a block hangs cleanly.
Generous ease is a design decision. Poor fit is a mismatch between that design and your shape. A single number can't tell you which one you're looking at.
Which Measurements Matter for Each Garment Type
Not every measurement deserves equal weight. The points that decide fit change with the garment, and most charts list all of them with the same flat authority.
| Garment type | Body measurements to match first | Garment measurements to check | Typical ease note |
|---|---|---|---|
| Fitted dress or bodice | Bust, underbust, waist | Bust width, waist width, length | Close fit, little or no ease |
| Blouse or shirt | Bust, shoulder, sleeve length | Chest width, shoulder seam, sleeve length | Moderate ease, roughly 5-10 cm at the bust |
| Blazer or jacket | Chest, shoulder, arm length | Chest width, back length, sleeve length | Layering room, often 8-12 cm at the chest |
| Trousers or jeans | Waist, hip, inseam | Waist width, rise, outseam | Rise matters as much as waist |
| Skirt | Waist, hip, height | Waist width, hip width, length | Hip is usually the limiting point |
| Knitwear or stretch items | Bust, waist, hip | Stretched width, length | Often drafted with negative ease, fabric recovery decides the fit |
Why bust, waist and hip alone don't settle it
Models built on those three points are good. A 2025 study in Scientific Reports reported 89.66% size-prediction accuracy from key anthropometric measurements including bust, waist and hip. The remaining slice is where complaints come from, and accuracy of that kind still doesn't explain a failure caused by shape: a model can be right about your size and wrong about your proportions.
Fit-aware work now separates garment measurements such as top length, bust circumference and sleeve length from body measurements such as height, bust, waist and hips, and compares both sets before calling a fit. That's the correction worth making in practice. Read the table by garment, not by label.
For a blazer, chest and shoulder decide whether it will close and hang; sleeve length and body length are alterations. For jeans, hip and rise decide comfort, and the waistband is the part a tailor can adjust. Team kit shows the principle neatly: a jersey that clears the chest can still finish above the hip, which is why soccer jersey size charts list chest and length as a pair rather than a single number.
Fit-critical rule: choose the size that fits the point you cannot alter for that garment, then flag the rest for a tailor.
Common Mismatches and How to Fix Them
The most frequent complaint is the top half of a dress working and the middle not: the bust sits correctly, the waist gaps away from the back. Almost always the waist ease or the block shape differs from your own, and the garment was drafted for a straighter waist-to-hip line.
| Mismatch | Likely cause | Fix |
|---|---|---|
| Bust fits, waist gaps | Waist ease or shape differs from the body | Size to the bust and plan a waist alteration |
| Hips pull on a fitted skirt | Hip ease is too small for the hip width | Size by the hip and take in the waist |
| Body falls between two sizes | Measurements sit across chart intervals | Choose by the most fit-critical point |
| Too long despite correct chest | Length not matched to torso length | Compare the garment length with the torso measurement |
| Stretch knit feels loose | Fabric recovery differs from woven cloth | Size by the stretched measurement and fibre content |
| Wrong size after using only the chart | Only one number was compared | Compare body and garment measurements together |
Shape is the variable charts compress hardest. Research on apparel sizing describes the translation from body dimensions into garment structures and argues that linear measurements overlook the body's three-dimensional complexity, with substantial body-proportion variation appearing inside a single nominal size, as reported in the International Journal of Fashion Design, Technology and Education.
Some of these you can settle on the product page, and some you can't. Falling between intervals, or a garment length that runs long against your torso, are decisions you make with the numbers in front of you. A waist gap or a hip that pulls on a structured skirt is a tailor's job, and knowing that in advance changes which size you order rather than whether you order.
What to check before you size down: if the tight point is a seam you can't let out, order the larger size and alter. Taking in is routine; letting out is limited by the seam allowance.
Length deserves its own note, because shoppers rarely measure for it. Record the garment length you already like on a similar piece in your wardrobe, from the high shoulder point to the hem, and compare that with the product page. It's a two-minute measurement that prevents the "right chest, wrong everything else" return.
Before you order a second size, go back to the fit-critical table for that garment type and size by the point that decides the fit.
When to Trust the Chart and What to Check Before You Order
A chart is a starting point for most shoppers, not a verdict. The useful question isn't whether the chart is accurate but how much weight it deserves for this purchase.
Three purchase situations
First order from a brand you don't know. Give the garment measurements and the fit-critical points the most weight, and treat the size label as a summary rather than a target. Brands differ in measuring points, so import the numbers rather than the letter.
Repeat order from a brand whose fit you already own. The chart is usually enough. You know how their size 10 behaves on your shoulders, and that memory is better data than any table.
A group order across several different bodies. Bridesmaid dresses and team kit are the classic case. Measure each person separately and let each size come from their own numbers; sizing a group from one person's chart is how four dresses end up at a tailor.
For unusual proportions, a fit tool does the comparison work in one step. Robosize gives one precise size and fit recommendation for each specific garment rather than a generic label, using the shopper's height, weight and age plus the closest illustration of their body proportions. Our social proof feature also shows how the same garment worked out for people with a similar body, which helps when the numbers are borderline.
If you're weighing a fit tool against a static chart, this review of a hybrid sizing approach works through where each one holds up and where it doesn't.
Six checks before you order
- Record body measurements for the fit-critical points of this garment type, not all of them.
- Confirm whether the chart quotes body or garment measurements, and switch your comparison accordingly.
- Compare your body numbers with the intended fit range, not just the size label.
- Read the ease note and the garment measurements that matter for that silhouette.
- Between sizes, choose the size that fits the most fit-critical point and plan an alteration for the rest.
- Save the measurements you used, so the next order starts from numbers you trust rather than starting over.
Knowing which numbers to trust turns a guess into a decision, and the conversion step between body and garment measurements is the part worth automating. Robosize builds a shopper-specific body model from a short questionnaire, then gives one precise size and fit recommendation for the specific garment on the page, so ease and the fit-critical point are both accounted for before checkout. Visit Robosize to see the fitting room running on a real catalogue.