A jeans waist that matches on paper can still be the wrong size. That's not a measuring error. It's what happens when a chart gives you one number for a garment controlled by at least four, and when the place that number sits on your body changes every time the rise changes.
Most charts lead with waist because waist is easy to print. Jeans don't fit from the waist alone. Your hip circumference, the difference between your hip and waist, where the waistband actually lands, and how the leg is cut decide whether a matching waist closes comfortably, gaps at the back, or pulls across the seat. Use any clothing size chart jeans table as a starting band, then test that band against hip, rise and flat garment measurements before you trust it.
Table of Contents
- Jeans Size Chart by Waist, Hip and Inseam
- Converting US, UK and EU Jeans Labels
- How to Measure Yourself for Jeans
- Inseam Length, Petite and Tall Options
- Body Measurements Versus Garment Measurements
- How Cut, Brand and Stretch Change Your Size
- Hip, Rise and Choosing Between Sizes
- Confirm Your Size and Reduce Returns
Jeans Size Chart by Waist, Hip and Inseam
Start with the band, not a single label. The table below gives reference body measurement bands for men and women, with waist in inches and centimeters, a hip range in inches, and the inseam options commonly offered alongside each band.
Reference Jeans Size Bands
| Size band | Waist (in / cm) | Hip (in) | Inseam options (in) |
|---|---|---|---|
| Men 28-29 | 28-29 / 71-74 | 37-38 | 30, 32, 34 |
| Men 30-31 | 30-31 / 76-79 | 39-40 | 30, 32, 34 |
| Men 32-33 | 32-33 / 81-84 | 41-42 | 30, 32, 34 |
| Men 34-35 | 34-35 / 86-89 | 43-44 | 30, 32, 34 |
| Men 36-37 | 36-37 / 91-94 | 45-46 | 30, 32, 34 |
| Men 38-40 | 38-40 / 97-102 | 47-50 | 30, 32, 34 |
| Women 24-25 | 24-25 / 61-64 | 34-35 | 28, 30, 32 |
| Women 26-27 | 26-27 / 66-69 | 36-37 | 28, 30, 32 |
| Women 28-29 | 28-29 / 71-74 | 38-39 | 28, 30, 32 |
| Women 30-31 | 30-31 / 76-79 | 40-41 | 28, 30, 32 |
| Women 32-33 | 32-33 / 81-84 | 42-43 | 28, 30, 32 |
Read the row across, not down one column. If your waist sits in the men's 30-31 band, the paired hip expectation in this reference is 39-40 inches. If your hip measures above that range, you're not in one clean band anymore. You're in a split fit, and the rise decision later matters more than the waist number.
How to Read a Jeans Label
Men's jeans commonly show waist first, then inseam. A label such as 31 x 32 indicates an approximately 31-inch waist and a 32-inch inseam, a format described in Levi's 1890 501 product and fit guidance. The order doesn't reverse. Waist is always the first figure in that pairing.
That format looks precise because it uses measurements instead of letters. Don't mistake the format for a universal standard. Jeans sizing grew out of denim workwear history, with Levi Strauss and Jacob Davis introducing riveted blue jeans in 1873 and the number 501 assigned in 1890, milestones noted on that same Levi's page. Brands have built their own grading, rises and fit blocks since then.
What This Chart Can't Tell You
These bands are reference body measurements, not a promise that every brand's 31 fits the same body. Each brand calibrates its intervals from its own pattern block, fabric and grading rules. Two brands can print the same waist and cut different hips, rises and thighs underneath it.
Use the table in three steps. First, find the band that covers your waist. Second, check whether your hip lands in the same row. Third, pick an inseam option and then compare all three figures with the brand's own chart in the same unit. If you're between rows, or your waist and hip point to different rows, don't average them. Move to measuring and rise.
European, UK and letter labels don't convert by copying a number across. They're market conventions layered on top of body measurements, so they need the brand's own conversion table, checked against your measured waist and hip in centimeters.
Practical rule: A band that fits your waist but not your hip isn't your size yet. It's only the row you start negotiating from.
Converting US, UK and EU Jeans Labels
No fixed formula converts a US jeans label to a UK or EU label. Labels are market conventions, not measurements, and brands don't grade to one shared standard underneath them. Any site that offers a single arithmetic conversion is assuming a standard that doesn't exist.
Convert through the body, not through the label.
- Find the brand's own table. Open the conversion chart for the exact brand and region you're buying from, not a generic converter. If you're working from British sizing, a dedicated UK clothing size chart guide helps you read the UK labels before you match them.
- Measure in centimeters. Take your body waist and hip in centimeters using the measuring procedure below. Centimeters travel across markets better than dress numbers or letters.
- Match the band, not the number. Find the band in that brand's table that covers your centimeter figures. Ignore whether the printed US, UK or EU number looks familiar.
- Check the measurement basis. Confirm whether the chart lists body measurements or flat garment measurements. You compare your body tape to the first kind and a favorite pair laid flat to the second.
Take a shopper whose body waist measures 78 cm. She doesn't convert her usual UK number. She finds the band in the new brand's table that covers 78 cm, then checks her hip against that same band. If the hip falls outside it, the label conversion has already failed, even if the waist number looks right.
Letter sizes are the weakest labels in this process. An S, M or L tells you nothing usable unless the brand publishes the body waist and hip each letter is built for. When a brand won't state those figures, treat the letter as incomplete information and buy from the flat garment specifications instead. If it won't publish those either, you're guessing, and the return policy becomes part of the size decision.
How to Measure Yourself for Jeans
Measure the body the jeans have to fit, in the position the chart specifies. Most bad size choices don't come from a poor chart. They come from a tape taken over a sweatshirt, pulled to a number you prefer, or placed where an old pair sits rather than where the chart defines the waist.
The five steps below are summarized in this visual guide before you work through them in detail.
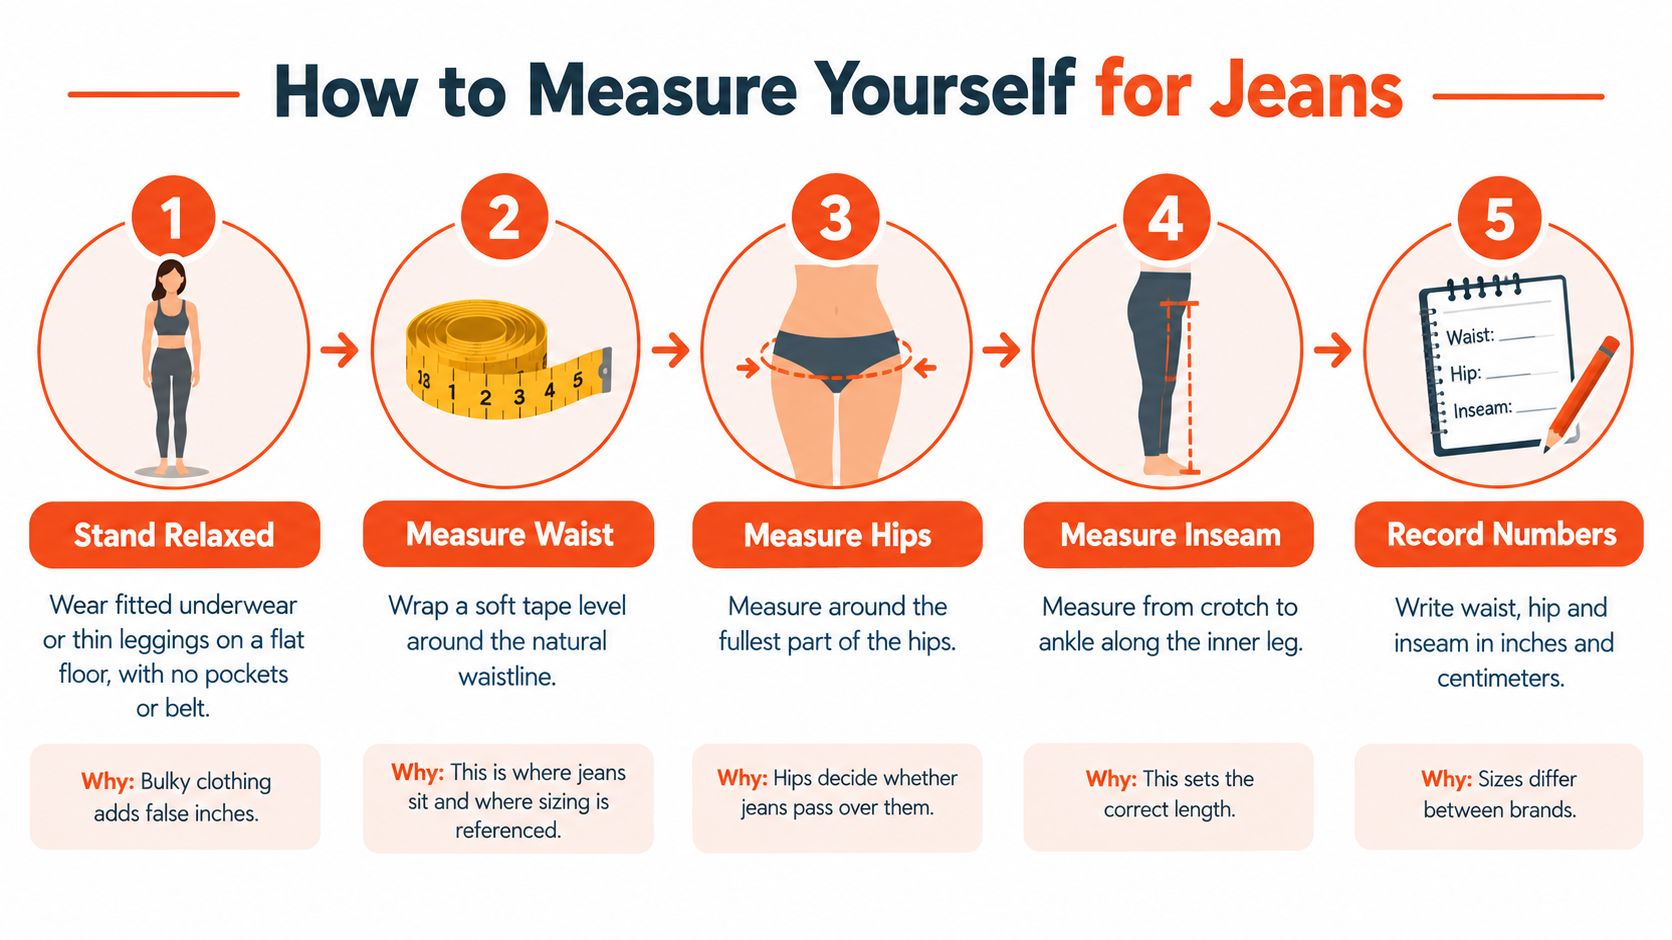
The Five Body Measurements Steps
- Stand relaxed and undressed down. Wear fitted underwear or thin leggings, stand on a flat floor, and remove belts and anything in your pockets. Bulky clothing adds circumference the jeans will never have to fit over.
- Measure the waist where the chart means. Wrap a soft tape around your natural waist, the narrowest point above the hip bones, keeping it level and parallel to the floor. It should sit snug without compressing the skin, because a compressed tape produces a waistband that digs in by midday.
- Measure hips at the fullest point. Stand with feet together and run the tape around the fullest point of the seat. Subtract your waist from this figure and write down the difference, since that gap shows early whether a waist led size will clear your seat. If you don't have a tape handy, measuring your waist with a phone covers a workable alternative for the waist figure.
- Measure inseam to the ankle bone. Run the tape from the crotch down the inner leg to the ankle bone. That gives you the body length; the hem allowance you want on top of it is decided separately, by shoe and break preference.
- Record both units and label them. Write each figure in inches and centimeters, rounded to the nearest half inch, and mark clearly which numbers are body measurements. Unlabeled numbers cause the classic error of comparing a body waist with a flat waistband weeks later.
These definitions, waist as a snug circumference at a specified position, hips at the fullest point, and inseam from crotch to ankle or hem reference, follow the measurement approach summarized alongside ISO 8559 clothing sizing standards. A chart that doesn't state its positions this clearly leaves you to guess where its numbers were taken.
Watching the tape placement once is worth more than rereading it, especially for the hip and inseam.
Measuring a Pair You Already Own
When you're sizing from a pair that fits, switch to garment measurements and say so in your notes. Lay the jeans flat, align the front and back of the waistband, measure straight across, and multiply by two for the flat waist circumference. Measure the inseam from the crotch seam to the hem. That flat procedure gives you a comparison figure for product pages that publish finished garment specs.
Note the state of the pair when you measure it. Record whether it's raw, washed, relaxed after a day's wear, or fresh from the wash, because those states don't measure the same. For stretch denim, record two waist figures, the unstretched measurement and the most comfortable stretched measurement. The gap between them tells you how much of the fit depends on elastane doing the work.
Three slips account for most wrong numbers. Pulling the tape tight enough to indent skin understates the waist. Measuring over thick pants overstates everything. Taking a flat waist from a stretched out favorite pair and treating it as the size to order builds a worn in waistband into a new garment that hasn't stretched yet.
Inseam Length, Petite and Tall Options
Pick the inseam closest to your measured leg, then settle the tie by hem preference and shoes. Inseam is the one jeans dimension a tailor can change in one direction easily, so it's also the dimension where a small miss costs the least.
Work it through in order. First, take your inseam from crotch to ankle bone, then add the hem length you want. Add about 2 inches for a stacked look that folds over the shoe, or about 1 inch for a clean single break. A 31-inch leg plus a 1-inch hem gives a 32-inch target, which points straight at the 32 option.
Second, when your total lands between standard options, let footwear decide. Between 30 and 32, or between 32 and 34, choose the option that suits the shoes you wear most with jeans. Heeled shoes and thick soles lift the hem and use up length, so the longer option serves them better. Flats and low sneakers let fabric pool, so the shorter option usually sits cleaner.
Third, if you fall outside the standard lengths altogether, look for short, petite or tall lines rather than forcing a regular inseam. Petite and tall ranges don't only change the hem. They typically adjust proportions through the leg, which a hem alteration on a regular pair can't replicate at the knee.
The alteration rule runs one way. A tailor can shorten a hem easily and cheaply. Lengthening one usually requires fabric left inside the existing hem, and many jeans don't carry enough allowance to release. If you're between lengths and unsure, buy the longer inseam, confirm the waist and hip fit first, and shorten once you've washed the pair and seen where the fabric settles.
A hem that's an inch long is an alteration. A waistband that won't close is a return. Spend your precision on waist, hip and rise, and let the hem be approximate.
Body Measurements Versus Garment Measurements
A tagged 32-inch waist is not necessarily a 32-inch waistband. That single confusion explains a large share of jeans returns where the shopper measured carefully and still got the wrong fit.
Under ISO 8559-2, clothing size designation is based on the body dimensions the garment is intended to fit, not the physical dimensions of the garment itself, as set out in the ISO overview of clothing size designation. The number on the label points at a body. It doesn't describe the cloth. A brand following that basis uses your body waist or hip as the sizing input, then publishes the finished garment specifications separately.
Several things sit between the label and the flat tape. Rise changes where the waistband sits on the body. Waistband position and construction change how the band measures when laid flat and doubled. Fabric stretch changes how far the garment can travel beyond its relaxed measurement. Put together, they mean two pairs with the same tagged size can measure differently across a table, and both can be made exactly as designed.
The photo below shows the body side of that distinction, a tape taken on the person rather than on the garment.
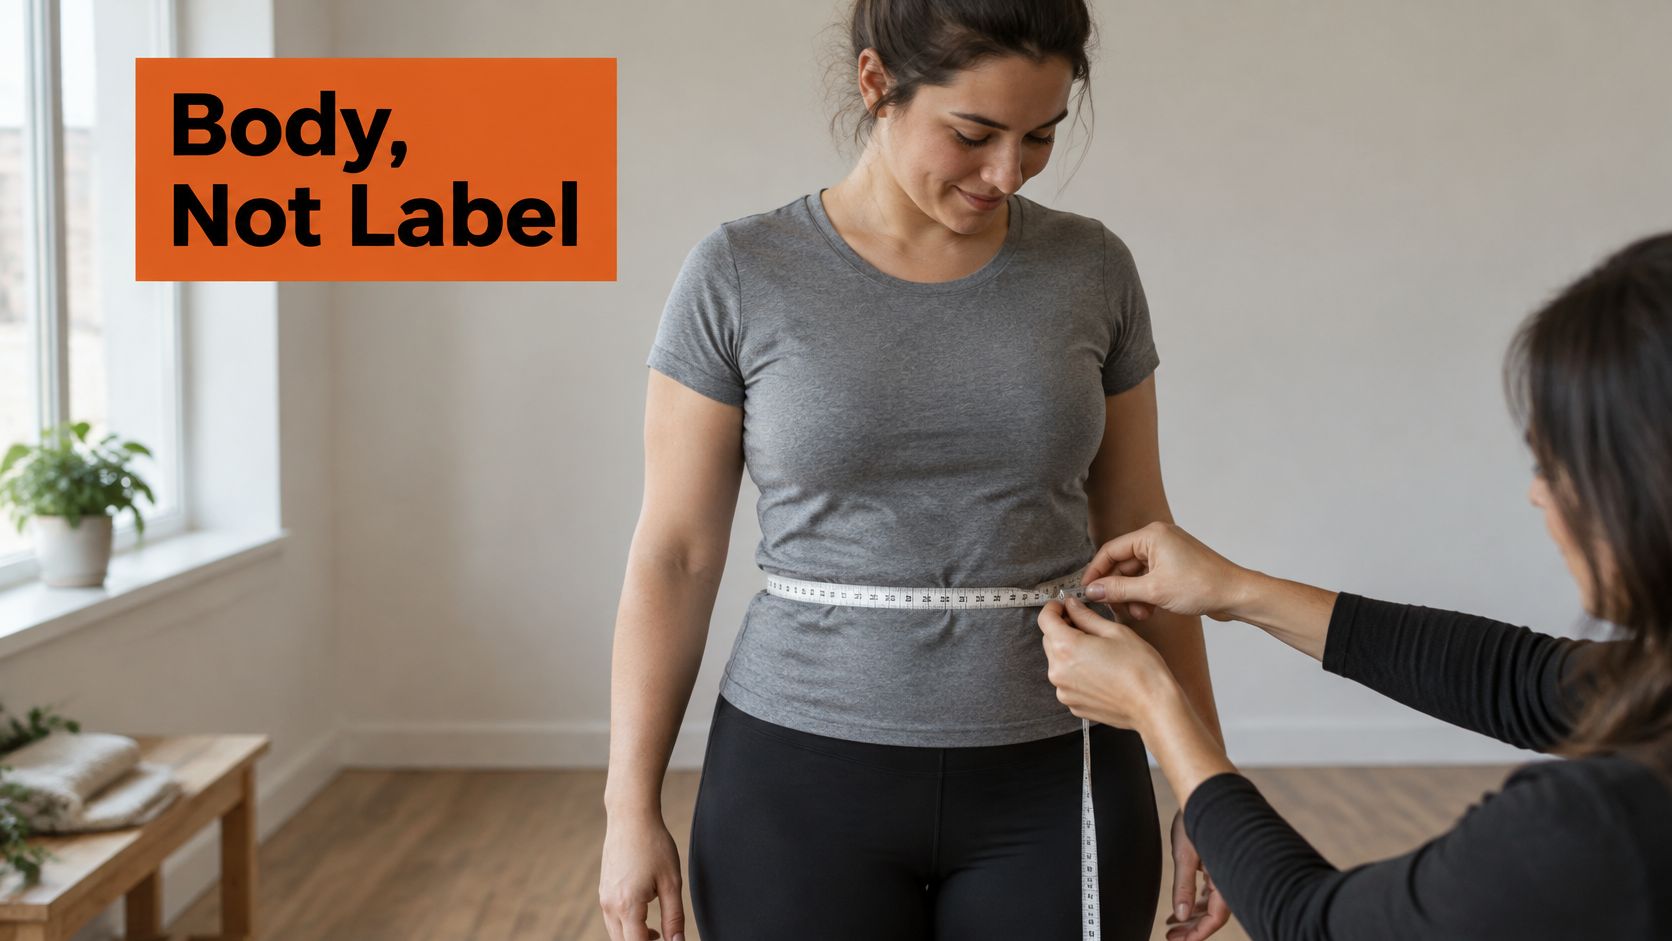
The Garment Specs Worth Comparing
When a product page publishes finished measurements, compare these against a pair that fits you, measured flat the same way.
- Finished waistband: The flat circumference, doubled from the aligned band.
- Rise: Front and back, since back rise shapes seat coverage and gaping.
- Thigh and knee: Where slim and skinny cuts succeed or fail.
- Leg opening: The hem width that decides how the jeans sit over footwear.
- Inseam: Crotch seam to hem, on the garment rather than the leg.
The anatomy point matters here. Low, mid and high rise jeans don't sit at the same body circumference, so a waist figure is meaningless until the chart states whether it refers to the natural waist or the garment's actual waistband position. A high rise band meets a narrower part of the torso than a low rise band on the same person.
Judge brand data with a short checklist. Every published value should state its measurement type (body or garment), body location, unit, tolerance and procedure. If those five things aren't stated, compare flat garment specs between brands instead of trusting labels, and treat any label without a stated measurement basis as incomplete.
How Cut, Brand and Stretch Change Your Size
Brands grade differently, and some grade generously on purpose. Different grading rules and vanity sizing mean one brand's 32 can measure like another brand's larger size when both are laid flat. The label stays familiar. The garment underneath it doesn't.
The same drift happens inside one brand. A pattern block is built per cut, so the thigh, knee and leg opening change while the waist number stays put. That's why a straight leg in your usual size can feel generous and a skinny in the same size, from the same label, can feel like a different garment category.
Cut Patterns and the Measurement to Check First
| Cut | Thigh and leg pattern | Stretch sensitivity | Measure first |
|---|---|---|---|
| Skinny | Narrow through thigh, knee and leg | High with stretch denim; recovery matters | Thigh and leg opening |
| Slim | Fitted thigh, gently tapering leg | Moderate | Thigh and knee |
| Straight | Even width from thigh to hem | Low to moderate | Hip and inseam |
| Relaxed | Full thigh, roomy through the leg | Low | Hip and thigh |
| Bootcut | Fitted thigh, flared from the knee | Low | Knee and leg opening |
Use the last column as a triage order. If muscular thighs are your usual failure point, a skinny cut's waist figure is nearly irrelevant until the thigh spec passes. If hems dragging over boots bother you, the bootcut decision lives at the leg opening, not the label.
Stretch changes the effective size while you wear it. Denim with little elastane holds close to its flat measurements through the day. Stretch denim, with its elastane content stated as a percentage on the fabric label, can feel correct at its most comfortable stretch and baggy by evening if recovery is poor. Record both the unstretched and comfortable measurements on any pair you own, and read reviews specifically for comments on whether the fabric springs back after washing. A pair that fits only at maximum stretch has no margin for a long day.
Wash state shifts the numbers too. Raw denim shrinks after its first wash, so a pre wash measurement overstates the size the jeans will settle at. Pre washed denim has mostly done its shrinking before you buy it. When a product page gives measurements, check whether they describe the garment as sold or after laundering, and size raw pairs with the post wash figure in mind.
Build one defense against all of this variation. Keep a reference pair for each brand you buy repeatedly, note its flat waistband, rise, thigh and inseam after washing, and compare those specs with any new chart before ordering. Brand loyalty doesn't guarantee consistency, but your own measured pair from that brand is the closest thing to a personal standard you'll get.
Hip, Rise and Choosing Between Sizes
The number most charts hide is the drop value, the difference between hip and waist circumference. Charts assume a fairly steady drop as sizes increase. Real bodies don't cooperate, and the assumption breaks hardest on bodies furthest from the fit model the chart was graded on.
A South African study developing a jeans sizing system for young Black pear shaped women measured an average drop of 39 centimeters, compared with 24 centimeters in standardized industry sizing, a 15-centimeter gap documented in the jeans sizing system study for pear shaped South African women. Its reference chart ran across codes 6 through 24, with waists from 60 to 100 centimeters and hips from 84 to 122 centimeters, while standardized drop values stayed between 22 and 24 centimeters. Related work in the same research collected 3D body scans from 210 participants aged 18 to 35 to build a population specific chart.
A shopper with a large drop faces the predictable result. Size by waist and the hips won't pass or will strain. Size by hip and the waistband stands away from the back. Neither outcome means she measured wrong. It means the chart's assumed proportions aren't hers, and no single row in it was built for her shape.
Compute your own drop before you shop. Subtract waist from hip, compare it with the gap implied by the chart row you're considering, and you'll see in advance whether that row expects proportions like yours.
How Rise Changes the Controlling Measurement
| Rise | Approximate front rise | Waistband position | Measurement that controls fit |
|---|---|---|---|
| Low rise | About 7-8 in (18-20 cm) | Sits on the hip bones | Hip and rise |
| Mid rise | Between low and high | Between navel and hip bones | Hip and waist together |
| High rise | Above mid rise | Near the natural waist | Waist, then thigh |
Rise decides which circumference the waistband actually wraps. High rise jeans sit near the natural waist, while mid and low rise styles sit lower on the hips, a distinction that explains why correctly measured shoppers still receive jeans that pinch at the hip or gap at the back, as described in a jeans size guide on measuring and reading labels. That guide also reflects survey findings that jeans are the most difficult garment category to fit, with shoppers reporting garments too small in one area and too large in another under linear grading.
A Decision Order for Split Measurements
When your numbers disagree, decide in this sequence rather than by instinct.
- Let rise arbitrate waist versus hip. On low and mid rise, choose the band that fits the hip, because the waistband sits on or near the widest part. On high rise, choose by waist, then verify the thigh spec.
- Resolve between sizes by fit preference. When one measurement lands between two sizes, choose the smaller size for a tighter fit and the larger for a looser one, following Levi's between sizes guidance covered earlier.
- Adjust for fabric behavior. For stretch denim, decide by the comfortable stretched measurement, not the unstretched one. For raw denim, allow room for first wash shrinkage before judging the waist.
Worked example. Your waist measures 30 inches, your hip 40 inches, and you want a mid rise straight leg. The mid rise band will sit low enough that the hip controls the fit, so choose the size that accommodates the 40-inch hip and accept the larger waistband. A tailor can take in a waistband cleanly. Letting out a hip that's cut too small has almost no seam allowance to work with. Buying the waist size here doesn't give you a snug fit. It gives you a return.
Every split measurement ends in one of three outcomes. Size up when the controlling measurement demands it and the excess lands somewhere alterable. Size down when stretch and fit preference support it and no hard circumference is at risk. Change the cut when both sizes fail in different places, because at that point the pattern proportions, not the size, are wrong for your body.
Confirm Your Size and Reduce Returns
Run this checklist before you order, in order. Each step catches a different failure, and skipping the early ones makes the later ones guesswork.
The checklist and the after delivery fit test are summarized in this graphic.
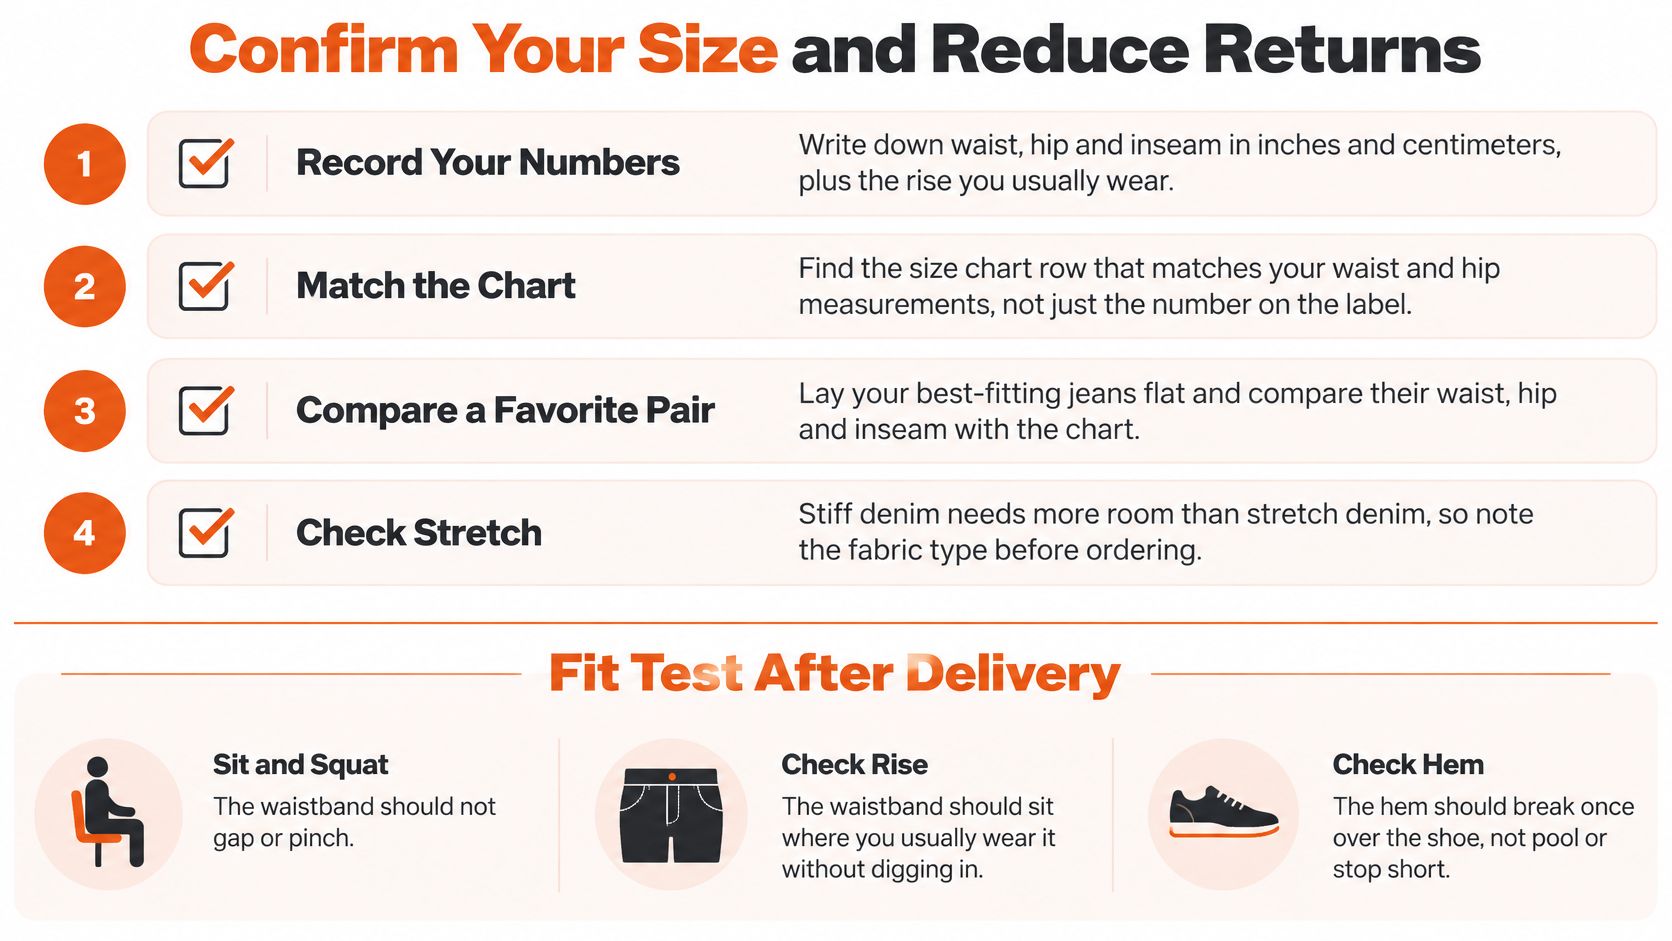
- Write your numbers down. Waist, hip and inseam in inches and centimeters, plus the rise you usually wear.
- Match in the brand's unit. Find the brand's own clothing size chart jeans table and match against it, not against the generic band or a women's clothing size calculator alone.
- Compare flat specs. Set the product's waistband, rise, thigh and leg opening beside a pair that fits, measured the same way.
- Read reviews for fit specifics. Look for reviewers who state their height, body shape and chosen rise, and scan for stretch recovery comments.
- Apply the decision order. Use rise, then fit preference, then fabric behavior whenever a measurement falls between or across bands.
- Use on page recommenders as a starting point. Where a retailer offers an AI size recommender such as Robosize, which generates a per garment recommendation on the product page, take its size as a first candidate and still confirm rise and flat measurements yourself.
- Check the exit. Confirm the return window and whether ordering two sizes is practical before the order, not after a bad fit arrives.
After delivery, fit test inside the return window with tags still on. If the brand says the fabric shrinks, wash first, then squat, sit and bend. The waistband shouldn't cut in when seated or slide when standing. Check the back view standing straight, because gaping at the back usually points to rise or hip fit rather than waist size, and sizing down for it often makes the hip worse.
Order the size the decision order points to, then record the verified result beside your measurements. The next pair should start from a fit you've proven, not from a label you remember.
If your store sells jeans online, Robosize generates a shopper specific body model from a short questionnaire and an optional selfie, then recommends the precise per garment size directly on the product page, so shoppers aren't left decoding waist bands, drops and rises alone. See how it fits your catalog at Robosize.