You're standing in your bedroom with jeans on over a base layer, phone in one hand, wondering if the number on your screen will help you buy the right size. That's the right moment to use a phone scan, because how to measure waist with phone has moved from novelty to a practical fit tool when it's done with the right landmark, posture, and expectations. For a broader look at body measurement tech, the guide to 3D body scanning is a useful companion, and Robosize's human body scanner overview shows how retailers turn those measurements into fit guidance.
Table of Contents
- Why Measuring Your Waist With a Phone Actually Works
- The Anatomy of a Reliable Phone Waist Measurement
- Two Phone Methods Step by Step
- Mistakes That Quietly Ruin the Number
- What the Accuracy Numbers Actually Mean for Your Size
- Turning Your Phone Waist Number Into the Right Size
- Your Repeatable Phone Waist Routine
Why Measuring Your Waist With a Phone Actually Works
You are in a fitting room, holding your phone beside your body and comparing two sizes on a retailer's chart. A phone measurement can make that choice less of a guess when you treat the scan as a repeatable process, not a camera trick. In one controlled study of 115 adults, smartphone waist estimates showed strong agreement with tape readings, with intraclass correlation coefficients of at least 0.93 and precision errors between 0.5 and 1.9 cm (study). The result is useful for shopping and garment selection, while still remaining an estimate rather than a professional tape reading.
Phone-based measurement usually follows one of two routes. A pure computer-vision scan uses front and side images to estimate your body shape. A phone-assisted tape measurement uses a flexible tape on your body while the phone helps you align, document, or record the reading. For a broader explanation of body-measurement systems, see Robosize's human body scanner overview and this guide to 3D body scanning.
What the phone is doing
The camera identifies visible landmarks, posture, and silhouette cues, then uses them to estimate a circumference. Clothing, stance, camera angle, and blocked views can all shift the result. A loose shirt may hide the body outline, while turning slightly toward the screen can change the apparent width.
Practical rule: a rushed or obstructed scan deserves less trust than a calm, repeatable one.
Health waist circumference and garment-fit waist are also different measurements. A health reading follows a defined body landmark, while a retailer may use the point where a waistband sits. Robosize can use body measurements as part of size recommendations, but the final choice still depends on the garment's cut and the brand's chart. Your phone supplies a useful fitting reference, not a universal size label.
The Anatomy of a Reliable Phone Waist Measurement
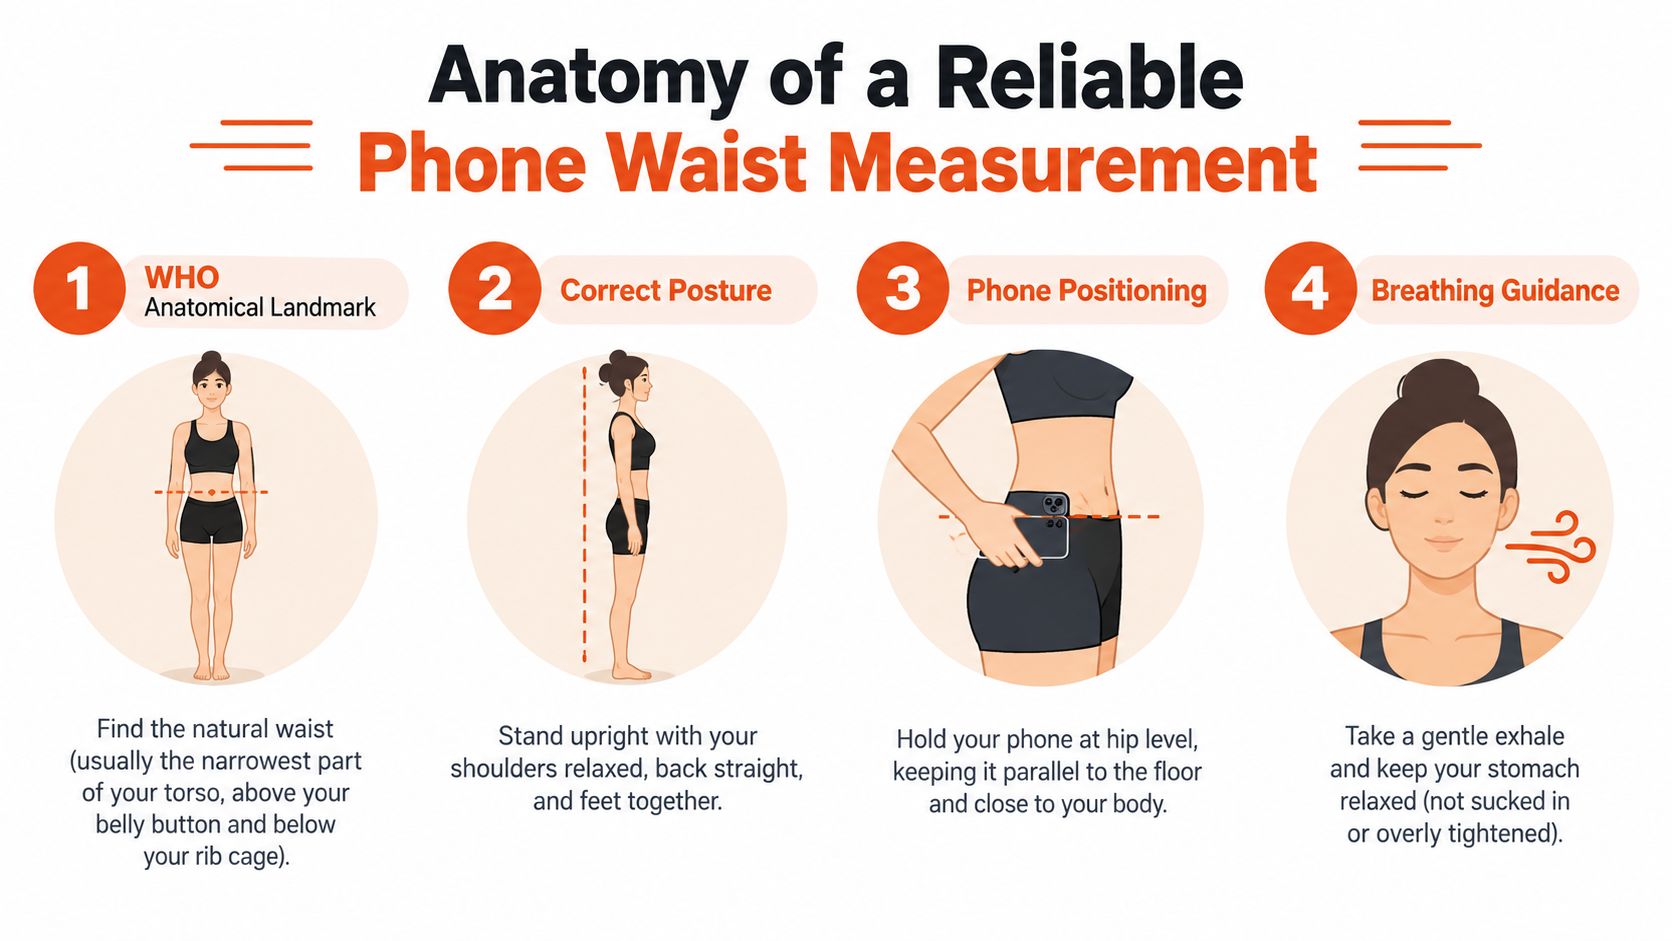
A reliable scan starts before the phone comes up. The WHO waist landmark sits at the midpoint between the lowest palpable rib and the top of the iliac crest, with your body upright, feet together, and arms relaxed at your sides (WHO guidance). That location matters because the waist isn't just the narrowest part you can see in the mirror. It works like a tailor marking a fixed point on the body before cutting fabric, rather than eyeballing where the waistband looks good.
Health waist and garment waist are not the same thing
A health waist circumference is measured at a fixed anatomical point. A garment-fit waist may be the spot a brand uses on trousers, skirts, or a dress waistband, which isn't always identical to the WHO landmark. The difference can be small enough to ignore in a roomy item, and large enough to change the size call on fitted clothing. This is exactly the distinction retailers like Robosize work with, since their size recommendations depend on knowing which waist the number describes.
The setup itself is simple. Stand on a level floor, keep your torso relaxed, don't twist toward the mirror, and don't tuck in your shirt if it hides the landmark. Measure at the end of a normal breath, not after sucking in your stomach or bracing for a photo.
A few details change the result more than you might expect. The WHO and NHLBI body locations can differ by clinically meaningful amounts, which is why landmark choice has to stay consistent across scans (WHO PDF). That's also why this part comes before the scan itself. A camera can only estimate what your setup makes visible.
The number improves when the body is still, relaxed, and measured at the same place every time.
Two Phone Methods Step by Step
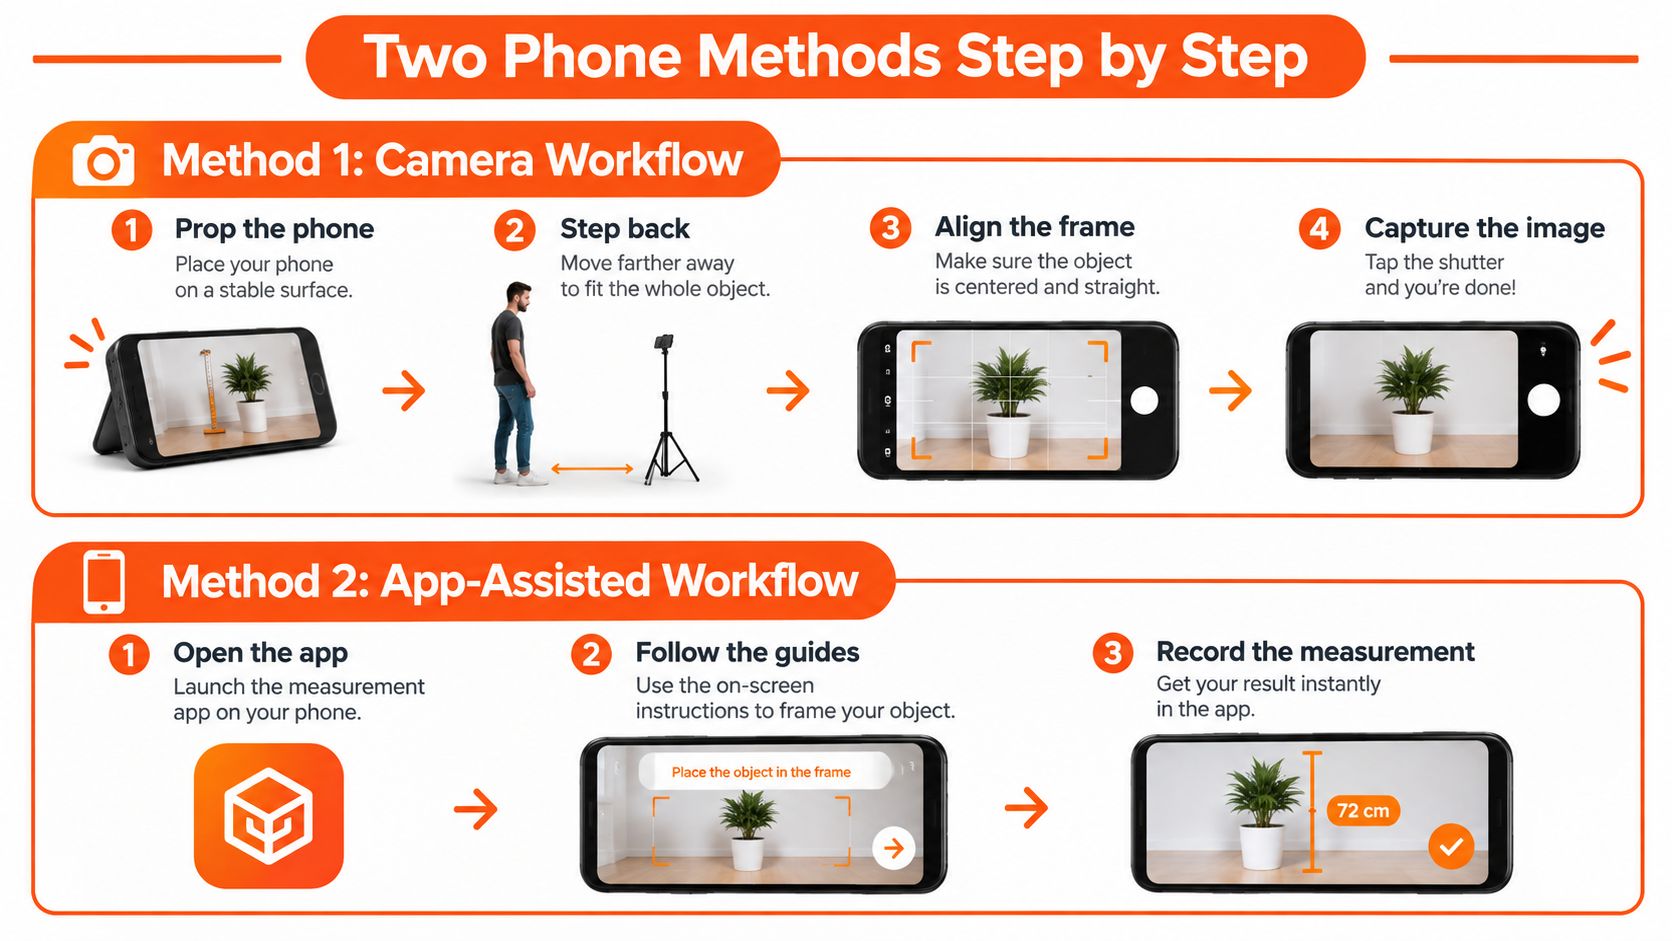
The first workflow is the pure camera scan: open the app, prop the phone so it stays steady, and give it the front and side views it asks for. In validation studies, apps have worked best with tight-fitting clothing, a clear view of the feet, and controlled distance and posture (validation summary). That setup gives the software enough shape information to estimate waist circumference instead of guessing.
Camera workflow
Start with the phone at the height the app asks for, usually around waist level in a stable position. Step back until the frame fits your full body, then follow the on-screen outline or capture guide. If the app asks for both front and side views, give it both, because one angle alone forces the software to infer too much.
If you're wearing a loose hoodie, the scan has to read fabric instead of body. That's why fit-focused workflows usually favor close-fitting clothes or a thin base layer. When the landmark is hidden, delete the scan and repeat it rather than pretending the estimate is usable. For a wider overview of body-measurement systems, see Robosize's free body scanner article.
App-assisted tape workflow
The second workflow is calmer and more exact. Place a stretch-resistant tape horizontally at the WHO landmark, keep it level, and use the phone camera to confirm the tape isn't tilted. Then take a photo for your record and enter the reading into the app or retailer tool. The tape stays the reference, and the phone handles documentation.
A simple habit helps with either method. Take two or three captures and use the repeated result rather than the first one that looks convenient. When readings swing a lot, the scan usually tells you more about setup problems than body size.
The process works differently for shoppers who want a retail fit outcome rather than a lab-style measurement. Robosize's clothing size comparison guide is a relevant next step if you want to see how measurements translate into sizing logic on product pages.
The quick comparison below makes the choice easier.
| Method | Best for | Main tradeoff |
|---|---|---|
| Pure camera scan | Fast fit checks, remote shopping, repeated use | Depends on posture, lighting, and visible landmarks |
| Phone-assisted tape | More cautious shoppers, onboarding, quality checks | Slower, still needs careful landmark placement |
Mistakes That Quietly Ruin the Number
Most bad readings come from human setup, not the phone. The biggest mistake is measuring at the narrowest visible point instead of the WHO midpoint. That spot feels natural in a mirror, but it produces a number that matches neither health thresholds nor a retailer's fit logic, since the WHO protocol linked in the anatomy section defines the midpoint differently.
The mistakes that change the number
- Pulling the abdomen in: This shortens the reading and makes the scan look better than the body measures.
- Holding your breath: The torso stiffens, and the number stops reflecting a normal relaxed state.
- Wearing bulky clothing: Fabric adds space, so the app may read clothing instead of shape.
- Tilting the camera: The tape or landmark can look level on screen while sitting crooked on the body.
- Using only one view: Without the side shape, the app has to estimate more and verify less.
- Changing landmarks between scans: One measurement at the navel and the next at the true midpoint will not compare cleanly.
Leaning toward a mirror creates another quiet error. It often compresses the abdomen just enough to trim the result, especially when you want to look straighter in the frame. That shift can flip a size recommendation, which matters more for garment fit than for a health threshold, where a few millimeters rarely change the category you land in.
Delete the scan when the setup was wrong. A bad number repeated three times is still a bad number.
Treat the first obviously off reading as a signal to reset. Explaining it away is how one flawed capture becomes the number you shop with.
What the Accuracy Numbers Actually Mean for Your Size
A strong correlation does not guarantee a perfect size pick. Correlation tells you whether the app tracks your body in the right direction, while absolute error tells you how far a single reading might sit from the truth when you are deciding between M and L. Only the second number matters at the moment of choice.
In the validation study cited earlier, phone-based measurement reported precision errors of roughly 0.5 to 1.9 cm, with waist and waist-to-height ratio falling inside predefined 5% equivalence regions. A separate evaluation reviewed in the literature reported a mean absolute waist error of about 3.4 cm and a root-mean-square error of 4.4 cm (reviewed study). Both sets of figures are useful, but together they explain why a casual scan should be read as a range, not a single perfect digit.
What that means in practice
| Reported error | Lab vs casual scan | What it means for sizing |
|---|---|---|
| About 0.5 to 1.9 cm | Controlled conditions, repeatable setup | Usually good for narrow fit decisions if the scan is clean |
| About 3.4 cm mean absolute error | Less controlled, more real-world use | Fine for general size guidance, less safe at a size boundary |
| About 4.4 cm root-mean-square error | Broader estimate across readings | Confirms you should recheck when the result feels borderline |
Here is the practical read. A phone estimate earns your trust when the number lands clearly inside one size range, with room to spare on both sides. When it sits near a boundary, the honest move is a second scan or a fallback tape reading. That is not a flaw in the tool. It is how you use any measurement that carries a margin of error, the same way a fitting-room specialist would double-check before handing you the smaller size.
Turning Your Phone Waist Number Into the Right Size
A phone waist reading becomes useful only after you place it beside the right chart. Some brands measure the body at a standard landmark, while others build their guidance around a garment waistband. If those two reference points do not match, the number can look wrong even when the scan is fine.
Retail recommenders help most when they combine several inputs instead of relying on waist alone. Robosize uses shopper details such as height, weight, age, and body shape to produce a garment-specific size recommendation on the product page. That matters because waist size by itself does not show how fabric will stretch, sit, or fall on the body.
What to check before you trust the output
Start with the units. A chart in inches and a scan in centimeters can create a mismatch that has nothing to do with fit. Then check the privacy note. Some self-photo tools process images locally, while others store data on servers or use it for model training, so the disclosure should be clear before you upload anything.
If the recommender and the size chart disagree, use the chart as the backup reference unless you already know the brand's fit data is inconsistent. A second tape reading often settles the question. If you want a second proportion check, find your waist to hip ratio and compare how it lines up with style and fit choices.
Robosize reports that its recommendation flow is associated with higher conversions, greater average order value, and lower return rates than static size charts. Those are retail outcomes, not body measurement accuracy, but they explain why a waist scan becomes more valuable when a system turns it into a size call. For a closer look at how brands map one size system to another, see the clothing size comparison guide.
Your Repeatable Phone Waist Routine
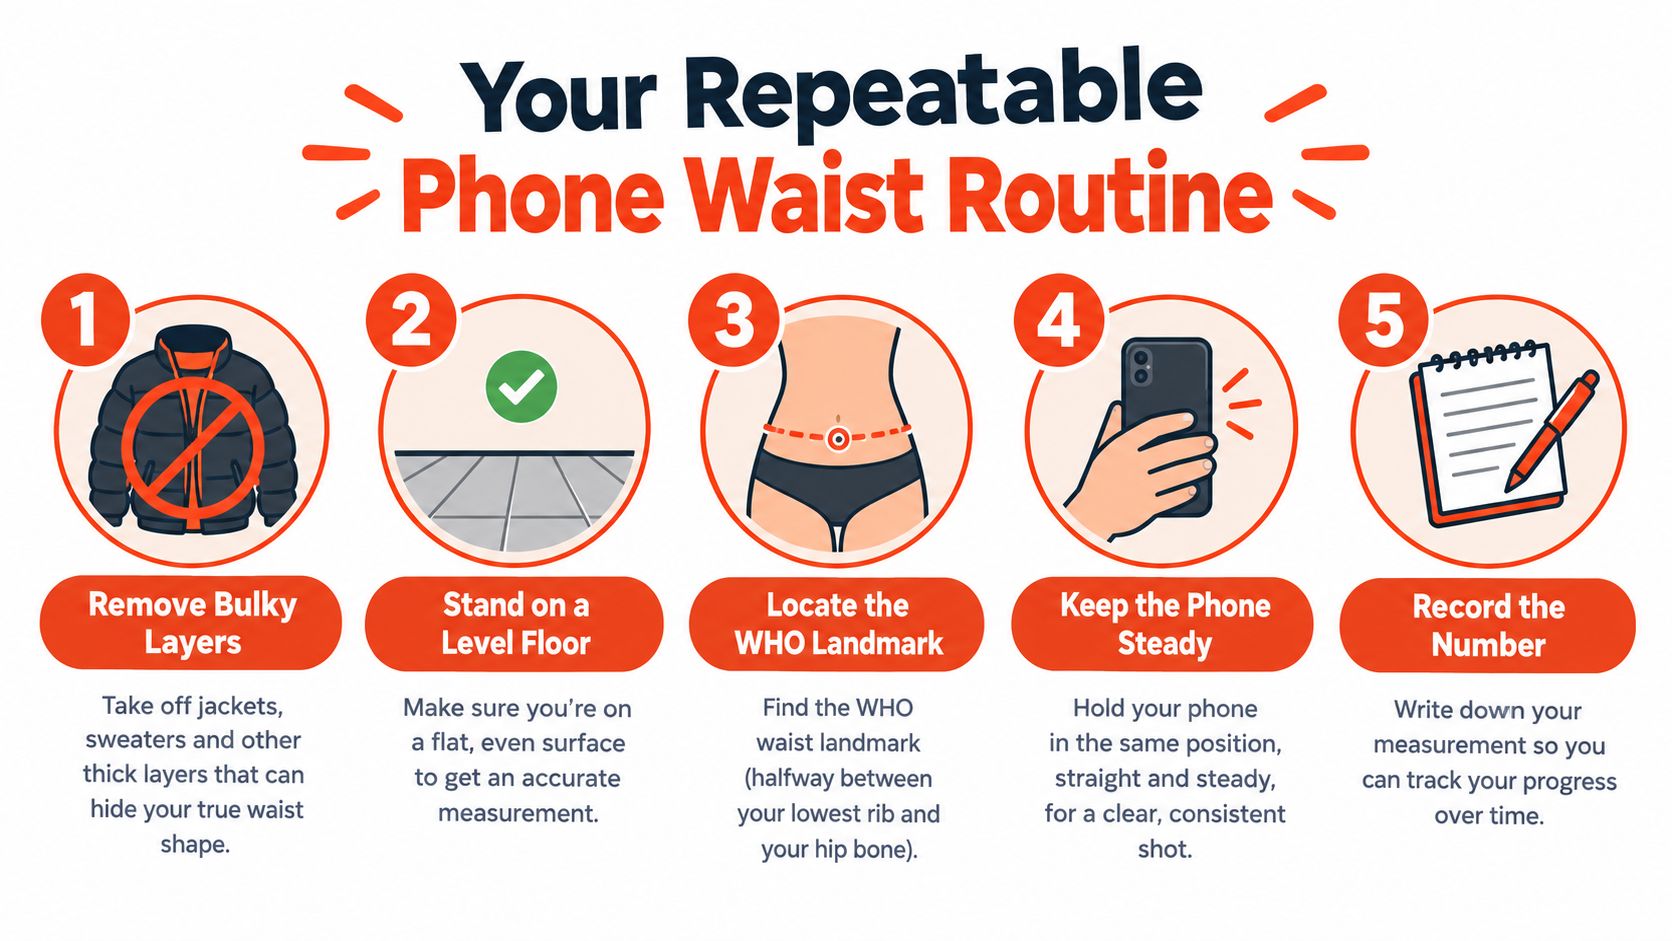
Keep the routine the same every time and the numbers stay comparable. Remove bulky layers, stand on a level floor, find the WHO midpoint, hold the phone steady, and repeat the scan until the reading settles. If the result still looks off, use a flexible tape and treat the phone as the estimate, not the final verdict.
- Remove bulky layers: Keep the torso visible or use close-fitting clothing.
- Stand on a level floor: Stay upright, feet placed normally, no twisting.
- Locate the WHO landmark: Midpoint between the lowest rib and the hip bone.
- Keep the phone steady: Capture the full body without camera tilt.
- Record the number: Save the reading, then compare it with the chart or recommender.
A phone scan is useful because it's consistent, not because it's magical. The same setup, the same posture, and the same landmark will beat a different “good enough” method every time.
Robosize gives retailers a phone-based fit workflow that turns shopper inputs into size recommendations and virtual try-on experiences. If you want to see how that fits into online shopping, visit Robosize and compare its sizing flow with the way you measure at home.