The most repeated advice about a clothing size chart for men is also the least useful: measure yourself, then pick the letter that matches. That advice treats S, M, L, and XL as if they were measurements. They aren't. A letter is a label a brand invented for a block, a market, and a preferred ease. Two shirts marked Medium can differ by several centimetres at the chest, and neither label tells you which number should win when your chest, waist, neck, and inseam disagree.
A usable chart is a decision tool. It names the body dimension that controls each garment, shows the range around each labelled size, and tells you what to do when those numbers split. The pages below walk that logic in order: why labels diverge, which measurements belong on a complete chart, how to read chest and waist intervals, how to measure without mixing body and garment numbers, why regional conversions stay estimates, and how to choose when a jacket, a shirt, and a pair of trousers each point somewhere else.
Table of Contents
- Why Men's Size Labels Differ From Brand to Brand
- Core Measurements Every Men's Size Chart Needs
- Men's Size Chart Ranges for Chest, Waist, and Hips
- How to Measure Chest, Waist, Hips, and Inseam Correctly
- Converting Sizes Across US, UK, EU, and Asian Labels
- Choosing the Right Size for Fit-Sensitive Garments
- Comparing Size Recommendation Tools and Online Options
- Quick-Reference Checklist and Your Next Step
Why Men's Size Labels Differ From Brand to Brand
A men's size label is a classification, not a tape reading. It comes from a population survey, a target body measurement, and assumptions about proportions and how much ease the garment should carry. That is why the same chest can land in different boxes once the brand, the cut, and the market change.
The anchor was set long before ecommerce. During the American War of Independence and the War of 1812, ready-made military uniforms increasingly used standardized measurements, and men's sizes were built mainly on chest circumference. Neck, waist, hip, thigh, and inseam were often estimated as proportions of that chest, or treated as lengths a tailor could alter. During the U.S. Civil War period, measurements from thousands of soldiers were recorded to improve uniform production. That record became part of the statistical base for later apparel systems, which is why so many charts still key jackets and outerwear to the chest while trousers add waist and inseam. The history is laid out in the account of U.S. standard clothing size.
Later standards made the system more formal without making it universal. The National Bureau of Standards introduced a revised sizing system in 1958, and ASTM later published tables covering men's sizes 34 through 60. Those milestones still don't turn a size number into an international measurement. They describe a surveyed body, a target girth, and a set of proportional guesses.
What a letter actually hides
Two men with the same chest circumference can need different sizes when waist, height, shoulder shape, or preferred fit differs. A chart that lists only S, M, L, or XL withholds the ranges that would show that split. A chart that states chest, waist, sleeve, and inseam in centimetres or inches gives you something you can compare.
Practical rule: If the only columns are letters, you don't have a size chart yet. You have a brand's nickname for a block.
Use the rest of this guide as a map. The next part lists the measurements a complete chart needs. After that you'll see how chest and waist intervals work, how to take the numbers, why US, UK, EU, and Asian labels don't convert cleanly, and how to pick a size garment by garment when the measurements disagree.
Core Measurements Every Men's Size Chart Needs
Build the chart on body measurements, not on the finished garment. ISO 8559-2 says size designation should communicate the body dimensions the garment is intended to fit, using the measurement definitions in ISO 8559-1. The standard allows one primary dimension, such as chest girth for a jacket, plus optional secondary dimensions such as waist girth, body height, or back-shoulder width. ISO 8559-1 is also meant to support physical and digital anthropometric databases, so the same terms can sit in a product data model, a size-chart upload, or a recommendation workflow.
A complete clothing size chart for men should at least separate chest, natural waist, seat or hip, height, and inseam, and it should say which measurement controls each product. Omit one of those and the shopper is guessing at checkout.
What each number controls
Chest is the primary control for most jackets and many shirts. Record it at the fullest part of the chest, tape level, arms relaxed. A 100 cm chest is a body fact. It is not automatically a size 100 garment.
Natural waist controls trousers and the waist suppression of a jacket or suit. Measure the narrowest part of the torso, usually above the navel, not where low-rise jeans sit. A man whose chest says one size and whose waist says another needs this number written down, not inferred.
Seat or hip matters wherever the garment has to clear the seat or the upper thigh. Fitted sportswear often needs chest, waist, and hip at the same time. Trousers that only list waist will miss a muscular thigh or a fuller seat.
Neck and sleeve are the pair that size many dress shirts. Chest alone will not tell you whether the collar closes or whether the cuff lands on the wrist.
Inseam is a length, not a girth. It decides where the trouser hem falls. It does not decide whether the waistband fits.
Height and back-shoulder width are usually secondary. Height sorts short, regular, and long. Shoulder width explains why a chest-correct jacket can still sit wrong. They refine a size. They rarely replace the primary girth.
Write each value the way you'd hand it to a pattern cutter: "chest 98 cm, natural waist 84 cm, hip 99 cm, neck 39 cm, inseam 81 cm, height 178 cm." That list is what you compare across retailers.
The same discipline shows up outside everyday menswear. Teams placing measurement advice for bulk gown orders still have to separate a body girth from a finished length, or a whole order is cut to the wrong block.
Store the raw numbers in centimetres. Convert to inches only on the screen, and keep the date you measured. A chart that mixes body and garment values will recommend the wrong size even when every tape reading was careful.
Men's Size Chart Ranges for Chest, Waist, and Hips
European practice gives a clean way to stop treating a size as a single point. Under the interval model described for EN 13402 size labelling, chest and waist reference values are commonly set in about 4 cm increments. Each labelled size stands for a band around a nominal body measurement, not for one exact centimetre.
An illustrative men's regular-fit sequence runs chest 92, 96, 100, 104, 108, and 112 cm, with waist references 80, 84, 88, 92, 96, and 100 cm. Read that pairing as a teaching sequence for one regular block. It is not a universal conversion table. A brand has to retune the waist next to each chest for its own customers and its own ease.
Nominal value versus accepted range
The number printed on the row is the centre. The shopper's body is allowed to sit inside an interval around it. With a 4 cm step, a 96 cm chest label can cover about 94 to 98 cm. The same logic puts a 100 cm label at roughly 98 to 102 cm, and a 104 cm label at roughly 102 to 106 cm.
Walk one shopper through it. His chest is 97 cm and his natural waist is 86 cm. Chest sits inside the 96 cm band (94 to 98). Waist sits between the 84 cm and 88 cm references, closer to 88. He is not "a 96." He is a 96-chest body whose waist is already leaning toward the next waist reference. That is the moment a single letter fails.
Height can be grouped in 4 cm or 8 cm steps, and a company or a country may pick either. Where torso or sleeve length changes the fit, publish short, regular, and long as separate options instead of stretching one chest size to cover every height.
| Chest reference (cm) | Waist reference (cm) | Approximate chest body range at 4 cm interval (cm) |
|---|---|---|
| 92 | 80 | 90–94 |
| 96 | 84 | 94–98 |
| 100 | 88 | 98–102 |
| 104 | 92 | 102–106 |
| 108 | 96 | 106–110 |
| 112 | 100 | 110–114 |
How a recommendation engine should use the band
Boundary logic needs both columns, the nominal centre and the accepted range. A chest of 98 cm sits on the shared edge of the 96 and 100 bands, so the engine should lower its confidence and look at the secondary dimension, usually waist or shoulder, before it picks. A chest of 95 cm sits comfortably inside 94 to 98 and can take the 96 cm label unless sleeve or height says short or long.
Don't line S, M, L, US numeric, UK, and EU labels up as exact twins of these centimetres. Those labels move with the brand and the market. The centimetre body dimension is the stable reference. Hips aren't in this regular-fit pairing on purpose. Add a hip column when the garment is seat-sensitive, and set that interval from the same population you used for chest and waist, not from a fixed drop copied off another brand's chart.
How to Measure Chest, Waist, Hips, and Inseam Correctly
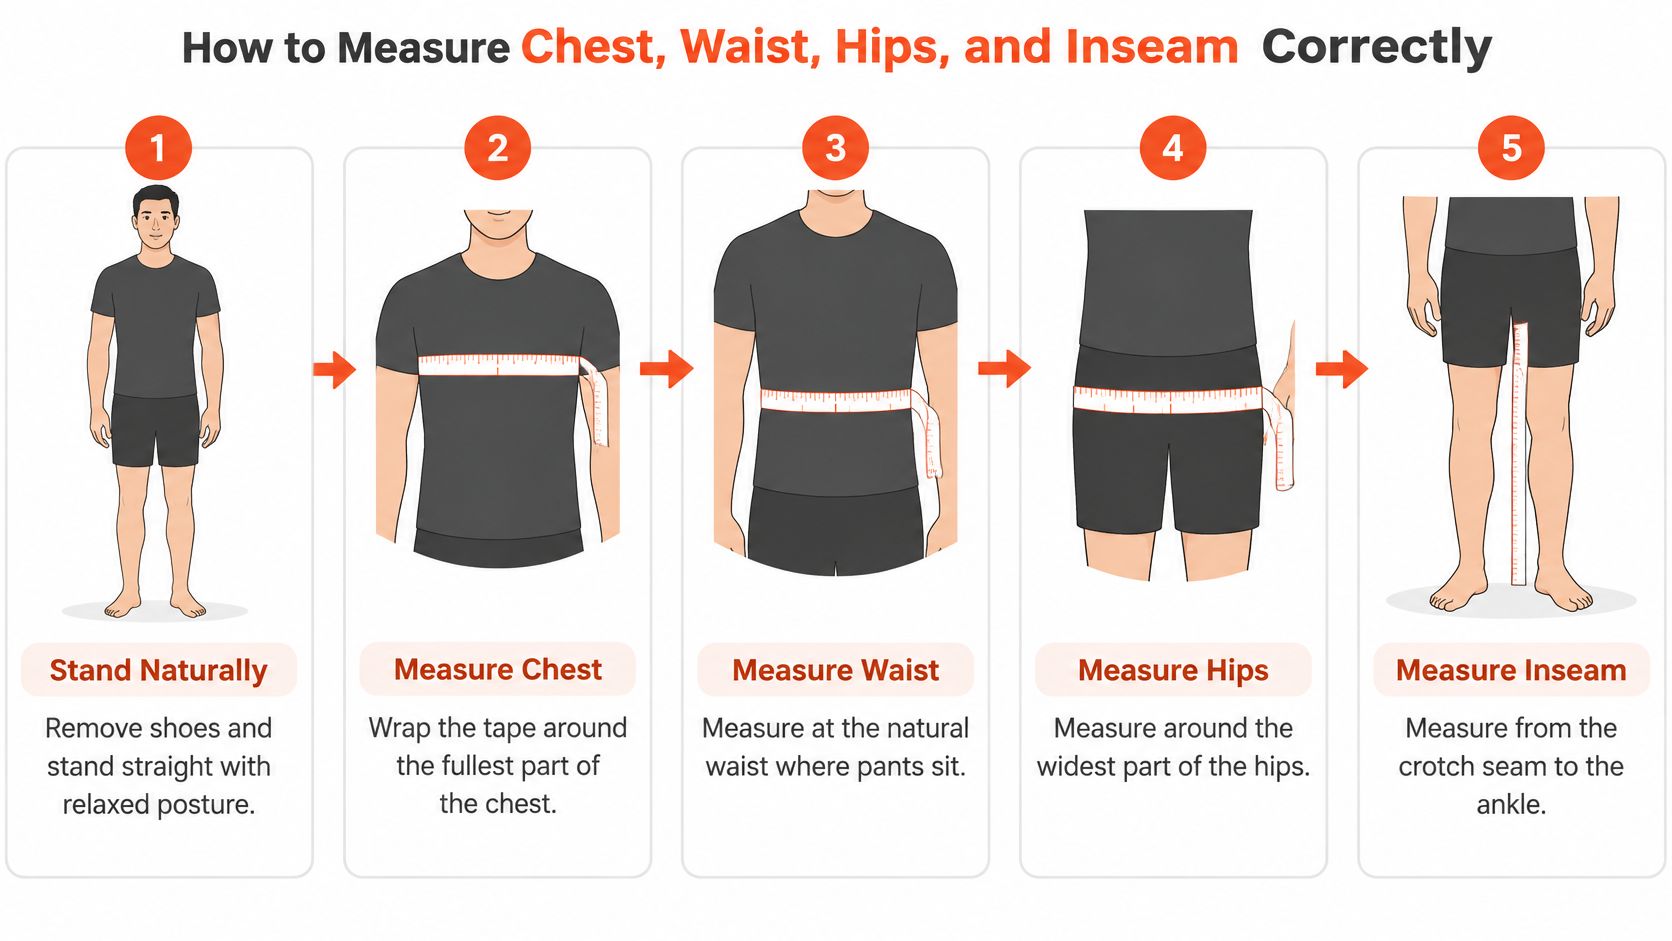
A size chart is a decision tool, not a one-number verdict. If your chest and waist point to different rows, accurate measurements help you choose which one should guide the garment: chest for a jacket, waist for trousers, and hips when the seat needs room. Stand naturally, barefoot, with a flexible tape held level against the body without squeezing. Breathe normally, record centimetres first, and note when you measured.
Take each measurement before comparing it with the chart. Match chest to the chest range, waist to the waist reference, and hips to the chart only for garments where seat fit matters.
The tape, one dimension at a time
Chest. Wrap the tape around the fullest part of your chest, under your arms and across your shoulder blades. Keep it parallel to the floor, lower your arms, then read the measurement. A lifted chest or tape that dips at the back can shift your result across a 4 cm band, enough to point you toward the wrong size.
Natural waist. Measure the narrower part of your torso, usually just above the navel. Keep the tape snug and flat. Suit trousers and many dress trousers sit at this line, while jeans often sit lower. Measuring at the jeans' waistband can therefore make a trouser waist seem tighter than its chart suggests.
Seat or hip. Stand with your feet together and measure around the fullest part of your seat. Use this measurement alongside waist for fitted sportswear and closer-cut trousers. If your hips are fuller than your waist, treat that as a fit difference to account for, not a reason to leave hips out of the decision.
Neck. Place the tape around the base of your neck, leaving room for one finger beneath it. Dress shirts are often sized by neck and sleeve, so chest alone cannot settle the shirt size.
Inseam. Measure from the crotch point, where the trouser seams meet, down the inside leg to the ankle bone for a standard break. Stop there rather than measuring to the floor. If you are measuring alone, use a pair that fits: follow its inside seam from crotch to hem.
Height. Stand straight and barefoot, then measure from the top of your head to the floor. Height helps select short, regular, or long proportions. It does not determine chest size.
Without someone to read the tape at your back, a guide to how to measure your waist with a phone can help you keep the measurement level. For every body measurement, the same technique applies: keep the tape flat and avoid pulling it tight. These essential measurements for garment making also show why consistent placement matters.
Body number or garment number
Label your result as a body measurement. A body chest of 96 cm does not mean the finished garment also measures 96 cm. Garments include ease, the extra room between the body and fabric, and the amount varies by slim, regular, or relaxed cut. Compare body measurements with a chart's body ranges, not with garment dimensions, unless the chart specifically says otherwise.
For a digital record, store centimetres as the measured value, display inches only as a conversion, and keep the measurement date. That way, an older reading is less likely to guide a size choice as if it were current.
Converting Sizes Across US, UK, EU, and Asian Labels
International standards gave menswear a shared measuring language. They never gave it one size designation. Sweden made the first official proposal on clothing sizing to the International Organization for Standardization in 1968. 17 countries then took an active part, and formal work began around 1970. The result was common methods for measuring the body and describing garment sizes, not a single global label. That history, and the survey scale behind it, is set out in this review of international sizing standards.
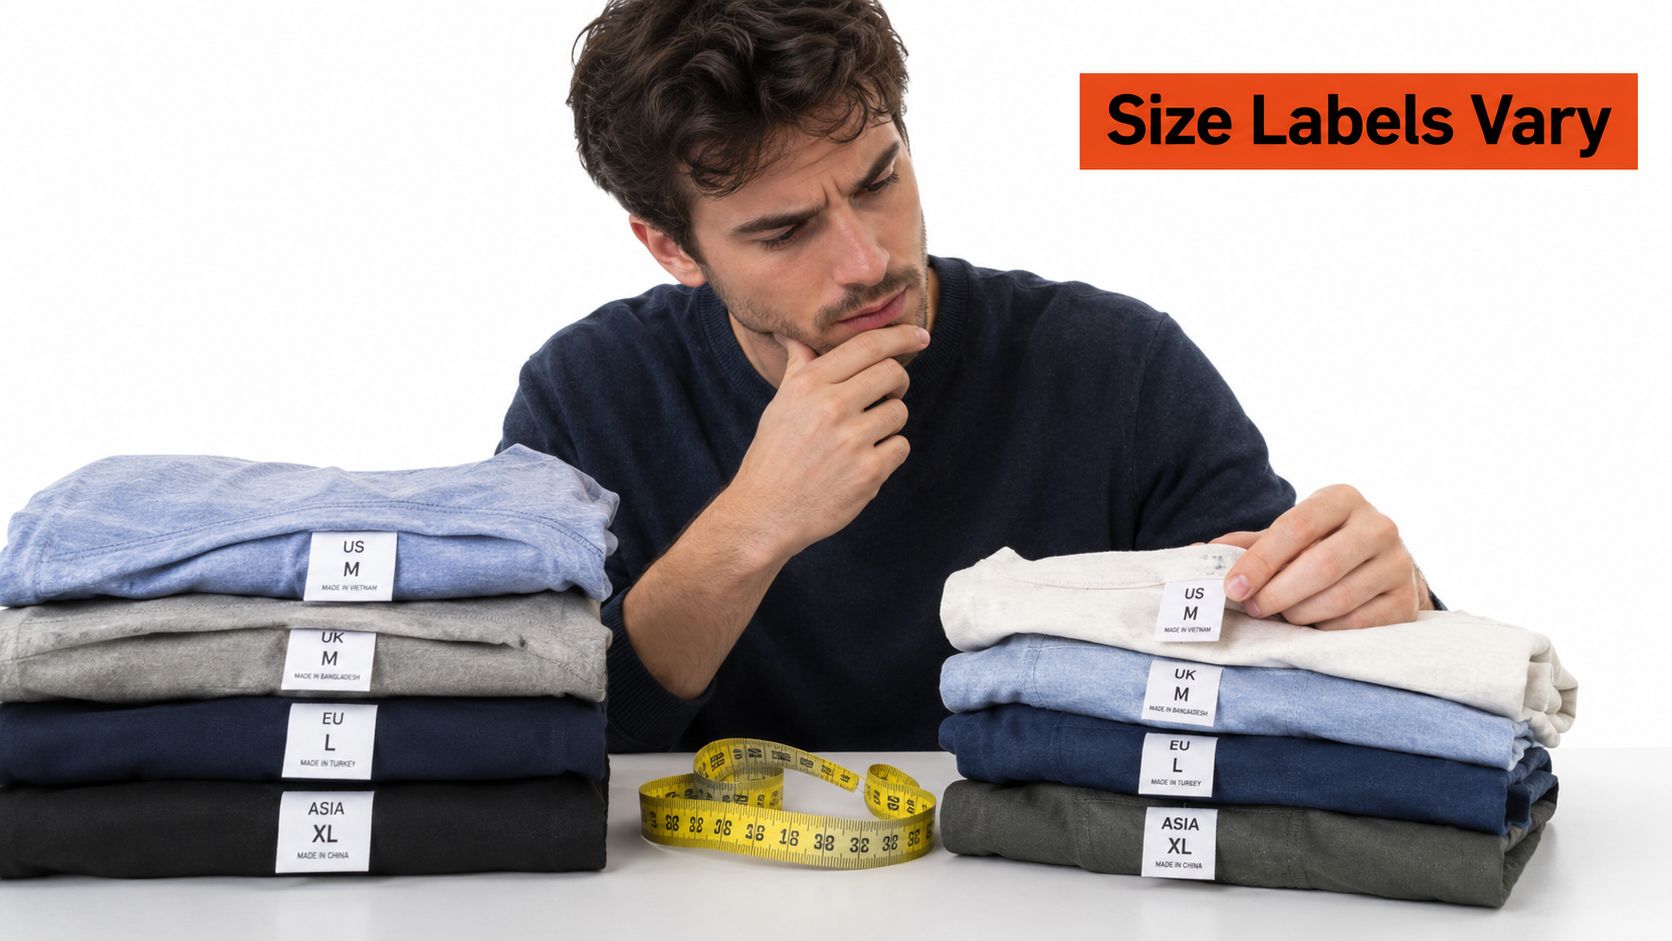
ISO 3636, published in 1977, covered men's and boys' outerwear. ISO 8559, published in 1989, covered garment construction and anthropometric body dimensions. ISO/TR 10652:1991 described a body-sizing system for compiling standard garment sizes for men, boys, women, girls, and infants. Countries and brands still use national systems and different conventions. There is no single worldwide men's size designation.
Why a conversion table is an estimate
Men's sizing commonly depends on height, chest, waist, and hip. Body drop, the difference between key girths, helps classify figure types, so two markets can share a chest number and still cut a different waist. Large surveys show how wide the bodies are. The Size NorthAmerica survey measured 18,000 people in the United States and Canada, took more than 100 body measurements per participant, and recorded adult male stature from 1,444 to 2,039 millimetres. A label set built for the middle of that range will miss both ends.
US, UK, EU, and Asian letters or numbers are estimates. A US numeric chest, a UK chest number, an EU suit number, and an Asian letter can be lined up on a brand's own table, and that table can still be wrong for the next brand. Treat every cross-region chart as a hypothesis you check against centimetres.
Convert from the body, then check the brand
- Start with the body measurements in centimetres: chest, waist, hip, and the length that garment uses.
- Ignore the letter you wore last time until the centimetres have a home.
- Open that brand's chart and match the primary girth to the brand's range, not to a generic US-to-EU column.
- If the brand's chart is garment measurements, don't subtract a guessed ease. Look for a note that separates body from garment, or try the size and use the return data.
- Only after that, glance at a regional equivalent, and expect it to be off by a size when the block or the drop differs.
A chart that names the market or standard, states the units, separates body from garment, and explains slim, regular, and relaxed is the one you can trust across borders. A chart that only says "EU 50 = US 40 = L" is a shortcut, and shortcuts are where returns start.
Choosing the Right Size for Fit-Sensitive Garments
A size chart is most useful when measurements disagree. If your chest, waist, hips, neck, and inseam point to different labels, choosing the largest number does not solve the problem. It fixes one area and leaves extra fabric elsewhere. The right choice depends on the garment's controlling measurement, then on the cut that can accommodate the rest of your shape.
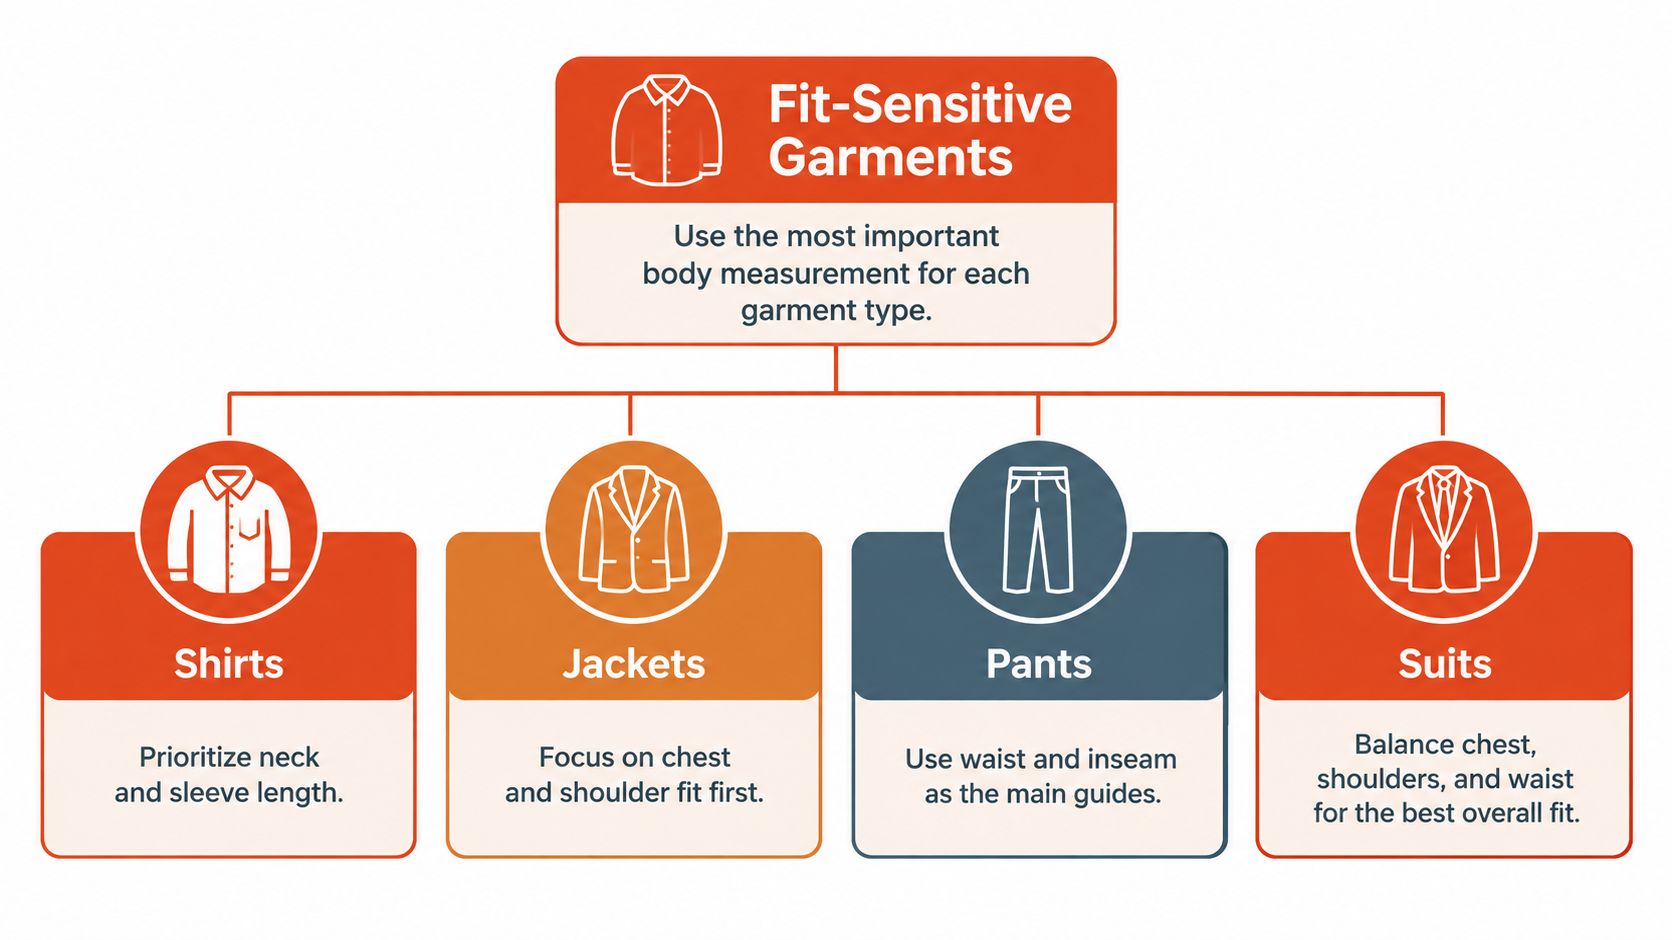
Shirts, trousers, and suits use different fit priorities. An analysis of brand size charts actually behave highlights why one-dimensional charts leave gaps: a single label cannot describe every proportion, and cross-brand conversions remain estimates. Read the chart as a decision tool, not a lookup table.
Priority by garment
T-shirts. Start with chest, then check shoulder comfort. If your chest falls between two ranges, consider how the shoulder and sleeve sit before changing sizes. A roomy chest and neat waist may call for a different cut, such as slim rather than regular, instead of a full size increase.
Dress shirts. Choose the neck size first, then check sleeve length and chest. The chest measurement helps show whether the fabric will pull across the buttons. If the larger neck size leaves excess fabric at the waist, look for a fitted or darted cut. Sizing down until the collar feels tight trades one fit problem for another.
Jeans and trousers. Waist and inseam set the starting point; hip and thigh measurements resolve conflicts. If the waistband fits but the thigh pulls, choose a cut with more thigh room and use the waist adjustment the brand allows. A straight leg may suit you better than a skinny cut. If the inseam is too long, hem the trousers rather than choosing a smaller waist.
Jackets. Check chest first, then shoulder. Extra room at the waist is usually easier to accept or alter than strain across the chest or shoulder. With a larger chest and smaller waist, choose the chest size and look for a more shaped block if you want a closer waist. A smaller chest size can restrict movement.
Suits. Use the chest to choose the jacket, then assess the trousers by waist and inseam. When the maker allows separate sizing, treat these as distinct decisions. For a shorter torso, jacket length is the fit issue to address, not chest size. For a longer torso, check whether a long fitting provides the needed length.
Fitted sportswear. Compare chest, waist, and hip together. If one measurement falls outside the garment's range, check its stretch and the brand's ease guidance before relying on a letter that may also appear on a woven shirt.
When the numbers split
Write down the conflict plainly: “Chest points to 100, waist to 92, hips to the larger range.” Then make the choice in order.
Primary dimension. Let the garment's controlling measurement lead. Other measurements help identify a better cut, unless they make the garment unusable, such as a collar that will not close or a thigh that restricts movement.
Drop. Compare chest with waist, or waist with hip. A small difference may suit a straighter block; a larger difference may call for more waist shaping or separate trouser sizing. Averaging the measurements creates a label that may fit none of them.
Fit category. Slim cuts leave less ease, so a larger label may work better when your chest sits between ranges. Relaxed cuts provide more room, which may make the smaller label comfortable. Athletic cuts often allow more space through the chest, shoulders, and thighs while keeping the waist closer. Tall sizing adds length, not girth, so it will not fix a tight chest.
Choosing the largest label by default can leave shoulders collapsed or trousers pooling. Choosing the smallest can make a jacket pull over the abdomen. Start with the measurement that controls the garment, then use the cut to address the other dimensions.
That priority method also applies when sizing several people to a shared standard for custom clothing for corporate events. A shared logo does not mean everyone has the same proportions. Match each wearer to the garment's controlling measurement rather than assigning one team-wide letter.
A height and weight visualizer can help you compare those figures with your girths before choosing. Use it as a cross-check, not a replacement for measuring: two people with the same chest may have different heights, weights, and needs for garment length.
Comparing Size Recommendation Tools and Online Options
A size tool is useful only if it answers the right question: which measurement should control when the chest, waist, hips, neck, or inseam point to different sizes? Online options handle that decision differently. Match the tool to the garment, then check what measurements its recommendation uses.
Static chart
A static chart works well when one measurement controls and the garment is simple. For a cotton T-shirt, a published chest range with clear units and a note distinguishing body measurements from garment measurements may be enough. Read the chest row first, then check whether the shirt's cut suits your build.
A chart gives less guidance for a jacket or suit. Shoulder shape and drape cannot be reduced to a single chest number, so the shopper must judge which measurement takes priority. A chart with letters alone leaves another gap: the same letter can cover different body ranges at different brands. The label is a starting point, not a shared standard.
Short questionnaire
A questionnaire may ask for height, weight, age, and body shape, then match those answers to the brand's chart. It can save the shopper from finding a tape and, if the store has set it up properly, apply different sizing rules to a shirt and a pair of jeans.
The limitation is that a category such as “athletic” cannot show exactly how chest and waist measurements differ. Someone with a broad chest and a narrow waist may receive the same category as someone whose measurements are closer together. The questionnaire also relies on the chart behind it. If that chart confuses body size with garment ease, the recommendation carries the error forward.
Selfie or model try-on
A photo or selected model can help you assess silhouette and length. Shoulder slope, jacket length, and trouser break are easier to judge visually than from a row of measurements. Compare views from more than one angle when available. A side or back view can reveal how fabric sits over the abdomen or seat, while a front image alone may hide those details.
The image still depends on sound size logic. A convincing rendering of the wrong size can mislead. Use the visual as a fit check, not as proof that the recommended chest, waist, or inseam is right.
Where a product-page recommender sits
Some tools combine a questionnaire with a product-specific chart. Robosize builds a shopper-specific body model using height, weight, age, and body shape, with an optional selfie, then recommends a size on the product page. Depending on the plan, it can show the product from up to three viewpoints in a session. It also accepts chart uploads and matches products to charts. Stores can add it through a Shopify app or JavaScript snippet.
Keeping a separate chart for each product matters because a shirt, a pair of jeans, and a jacket do not answer to the same controlling measurement. The recommendation still depends on the chart stating body ranges in centimetres. A tool can help apply those ranges, but it cannot repair unclear or inaccurate chart data.
If the store's chart is the weak point, improving the chart may matter more than adding another question. A free body scanner walkthrough shows how a short capture can feed a size suggestion, so shoppers are not left to interpret S, M, and L without measurement context.
| Method | Works well when | Breaks when |
|---|---|---|
| Static chart | One measurement controls and ranges are published | The chart uses letters only, or the garment's jacket and suit drape matters |
| Questionnaire | The shopper will not measure and the chart is clear | Shape categories conceal different chest and waist measurements |
| Selfie or model | The shopper needs to assess silhouette and length | The recommendation beneath the image uses the wrong size logic |
Choose by garment risk. A T-shirt may be straightforward to select from a chart. A suit calls for closer attention to the measurements and how the garment is meant to sit.
Quick-Reference Checklist and Your Next Step
A men's size chart works best as a decision tool, not a one-letter answer. Before buying or publishing one, check which measurement should lead for that garment and how the other measurements affect fit.
Confirm the market or standard. Identify whether a row uses a US numeric size, a UK chest measurement, an EU interval, or the brand's own sizing block. A letter by itself does not tell you which system the chart follows.
Separate body from garment measurements. Check whether the chart describes the wearer or the finished clothing. Garment measurements include ease, so they can be larger than the tape reading you took from your body.
Record the five measurements in centimetres. Note chest, natural waist, hips, neck, and inseam, plus height if the brand offers length options. Keep the readings together so you can compare them with each product's chart.
Choose the primary dimension for the garment. Neck and sleeve guide dress-shirt sizing; waist and inseam guide trousers; chest leads for jackets and suits. Fitted sportswear may require checking chest, waist, and hips together.
When measurements point to different sizes, follow the primary dimension, then check whether another cut or length option addresses the mismatch. A shirt's neck size cannot be averaged with a trouser waist, and choosing the largest label by default may leave other areas too loose.
Use the full interval. A nominal 96 cm chest on a chart with 4 cm steps might sit in a band from roughly 94 to 98 cm. Compare your body measurement with the range, not just the label at its midpoint.
Treat international conversions as estimates. Convert your centimetre measurements, then check the brand's own chart. US, UK, EU, and Asian labels do not guarantee exact equivalents.
If a chart leaves you unsure, identify what is missing: a body-versus-garment definition, a unit, a relevant measurement, or a clear primary dimension. A familiar letter cannot fill in that information.
For shoppers, the next step is practical: take measurements without shoes, record them in centimetres, and compare them with the brand's body ranges before checkout. Retailers can audit each men's chart for clear units, measurement definitions, and a primary dimension suited to the product. A product-page recommendation can then help shoppers act on that chart instead of guessing from one letter.